A sugar tong arm splint is a device applied to immobilize the wrist and arm to prevent supination and pronation of the wrist and forearm.
Indications
Distal radius fracture (3)
Distal ulna fracture
Contraindications
None
Complications
Thermal injury (caused by the exothermic reaction between plaster or fiberglass and water)
Pressure sores, neurapraxia, and/or ischemic injury (caused by excessive pressure)
Compartment syndrome (sometimes caused, in part, by excessive tightness of circumferential wrapping)
Equipment
Stockinette, enough to cover the area from just distal to the metacarpophalangeal [MCP] joints (approximately 3 to 5 cm [1 to 2 inches]) to the mid-humerus
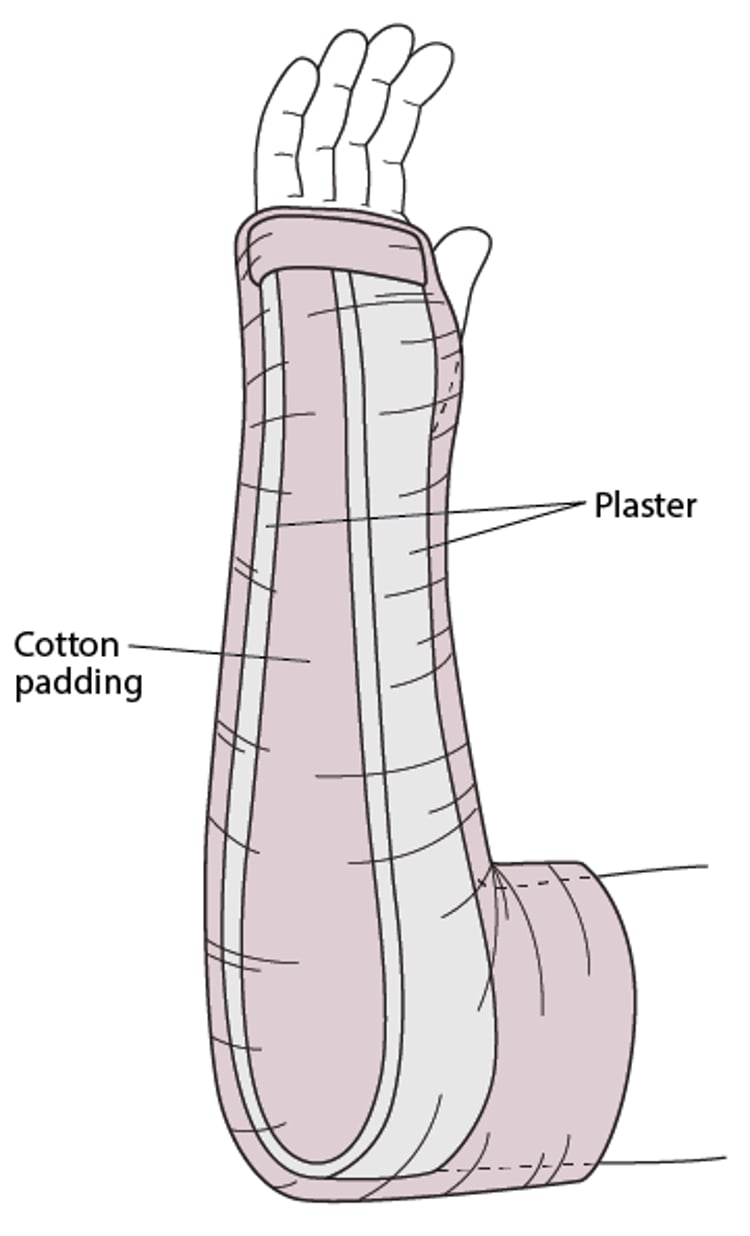
Roll padding (eg, cotton roll) 7.5-cm (3-inch) width
Plaster or fiberglass splinting material, 7.5- to 10-cm (3- to 4-inch) width—long enough to cover from one aspect of the MCP joints around the elbow to the other aspect of the MCP joints
Strong scissors and/or shears
Elastic bandage, usually 7.5- to 10-cm (3- to 4-inch) width
Lukewarm water and bucket or other container
Towels
Nonsterile gloves
Sugar Tong Splint

Positioning
The patient should be positioned so that the operator has appropriate access to the patient's affected hand.
Wrist should be splinted in neutral position which is extension at approximately 10 to 20°.
Splint the elbow at 90° flexion.
Step-by-Step Description of Procedure
Wear nonsterile gloves.
Apply stockinette, covering the area from distal to the MCP joints to the mid-humerus.
Make a hole in the stockinette to allow protrusion of the thumb.
Wrap the padding from the MCP joint to the mid-humerus; overlap each turn by half the width of the padding and periodically tear the wrapping across its width to decrease the risk of tissue compression.
Smooth the padding as necessary. Tear away any areas of excess padding to prevent areas of increased pressure on the skin.
Lay out a length of splint material matching the distance from just proximal to the MCP joints extending around the elbow and back to the MCP joints.
Unroll additional splint material, folding it back and forth along the first length until there are 8 to 10 layers (when using single-layer rolls).
Alternatively, if using ready-made splint material, cut a single piece to the above length.
Immerse the splinting material in lukewarm water.
Squeeze excess water from the splinting material (do not wring out plaster); use a towel to remove excess water.
Apply the splint material from the volar surface of the MCP joints along the volar surface of the forearm around the elbow and then along the dorsal surface of the forearm back to the dorsal surface of the MCP joints (at the metacarpal heads).
At the MCP joints, fold the extra stockinette and cotton padding over the edges of the splinting material.
Wrap the elastic wrap over the splinting material distally to proximally and overlap each revolution by half the width of the elastic wrap.
Smooth out the splinting material using your palms rather than your fingertips to conform to the contour of the arm to fill in the interstices in the material.
Maintain the wrist in neutral position, which is extension at approximately 10 to 20° and the elbow at 90° flexion until the splinting material hardens.
Check distal neurovascular status (eg, capillary refill, distal sensation, finger flexion and extension).
Aftercare
Advise the patient to keep the splint dry.
Arrange or recommend appropriate follow-up.
Instruct the patient to watch for complications such as worsening pain, paresthesias/numbness, and color change to the fingers.
Instruct the patient to seek further care if pain cannot be controlled with oral medications at home or if the patient develops paresthesias/numbness and/or color change distal to the splint.
Warnings and Common Errors
To avoid stiffness and loss of function, do not immobilize the wrist at 0° extension/flexion and also avoid flexion of the wrist.
Tips and Tricks
Warm water makes plaster set more quickly, so if you are unfamiliar with applying splints use cooler water to increase your working time.