Thoracentesis is needle aspiration of fluid from a pleural effusion.
Thoracentesis may be done for diagnosis and/or therapy.
Indications for Thoracentesis
Diagnostic thoracentesis
Indicated for almost all patients who have pleural fluid that is new or of uncertain etiology and is ≥ 10 mm in thickness on computed tomography (CT) scan, ultrasonography, or lateral decubitus x-ray (see figure Diagnosis of Pleural Effusion)
Diagnostic thoracentesis is usually not needed when the etiology of the pleural fluid is apparent (eg, viral pleuritis, typical heart failure).
Selection of laboratory tests typically done on pleural fluid is discussed in pleural effusion.
Therapeutic thoracentesis
To relieve symptoms in patients with dyspnea caused by a large pleural effusion
If pleural fluid continues to reaccumulate after several therapeutic thoracenteses, pleurodesis (injection of an irritating substance into the pleural space, which causes obliteration of the space) may help prevent recurrence. Alternatively, placement of an indwelling pleural catheter can allow drainage of pleural fluid by patients at home. Pleurodesis and placement of an indwelling pleural catheter are most commonly done to manage malignant effusions.
Contraindications to Thoracentesis
Absolute contraindications
None
Relative contraindications
Bleeding disorder or anticoagulation
Altered chest wall anatomy
Cellulitis or herpes zoster at the site of thoracentesis puncture
Pulmonary disease severe enough to make complications life threatening
Uncontrolled coughing or an uncooperative patient
Complications of Thoracentesis
Major complications include
Bleeding (hemoptysis due to lung puncture)
Re-expansion pulmonary edema and/or hypotension (1)
Hemothorax due to damage to intercostal vessels
Puncture of the spleen or liver
Vasovagal syncope
Bloody fluid that does not clot in a collecting tube indicates that blood in the pleural space was not iatrogenic, because free blood in the pleural space rapidly defibrinates.
Equipment for Thoracentesis
Antiseptic solution with applicators, drapes, and gloves
Thoracentesis needle and plastic catheter
3-way stopcock
30- to 50-mL syringe
Wound dressing materials
Bedside table for patient to lean on
Appropriate containers for collection of fluid for laboratory tests
Collection bags for removal of larger volumes during therapeutic thoracentesis
Ultrasound machine
Additional Considerations for Thoracentesis
Thoracentesis can be safely done at the patient’s bedside or in an outpatient setting.
Ample local anesthetic is necessary, but procedural sedation is not required in cooperative patients.
Thoracentesis needle should not be inserted through infected skin (eg, cellulitis or herpes zoster).
Positive pressure ventilation can increase the risk of complications.
Hemorrhagic complications are infrequent after ultrasound-guided thoracentesis in patients with abnormal preprocedural coagulation parameters (2).
Bloody fluid that does not clot in a collecting tube indicates that blood in the pleural space was not iatrogenic, because free blood in the pleural space rapidly defibrinates.
Only unstable patients and patients at high risk of decompensation due to complications require monitoring (eg, pulse oximetry, electrocardiography [ECG]).
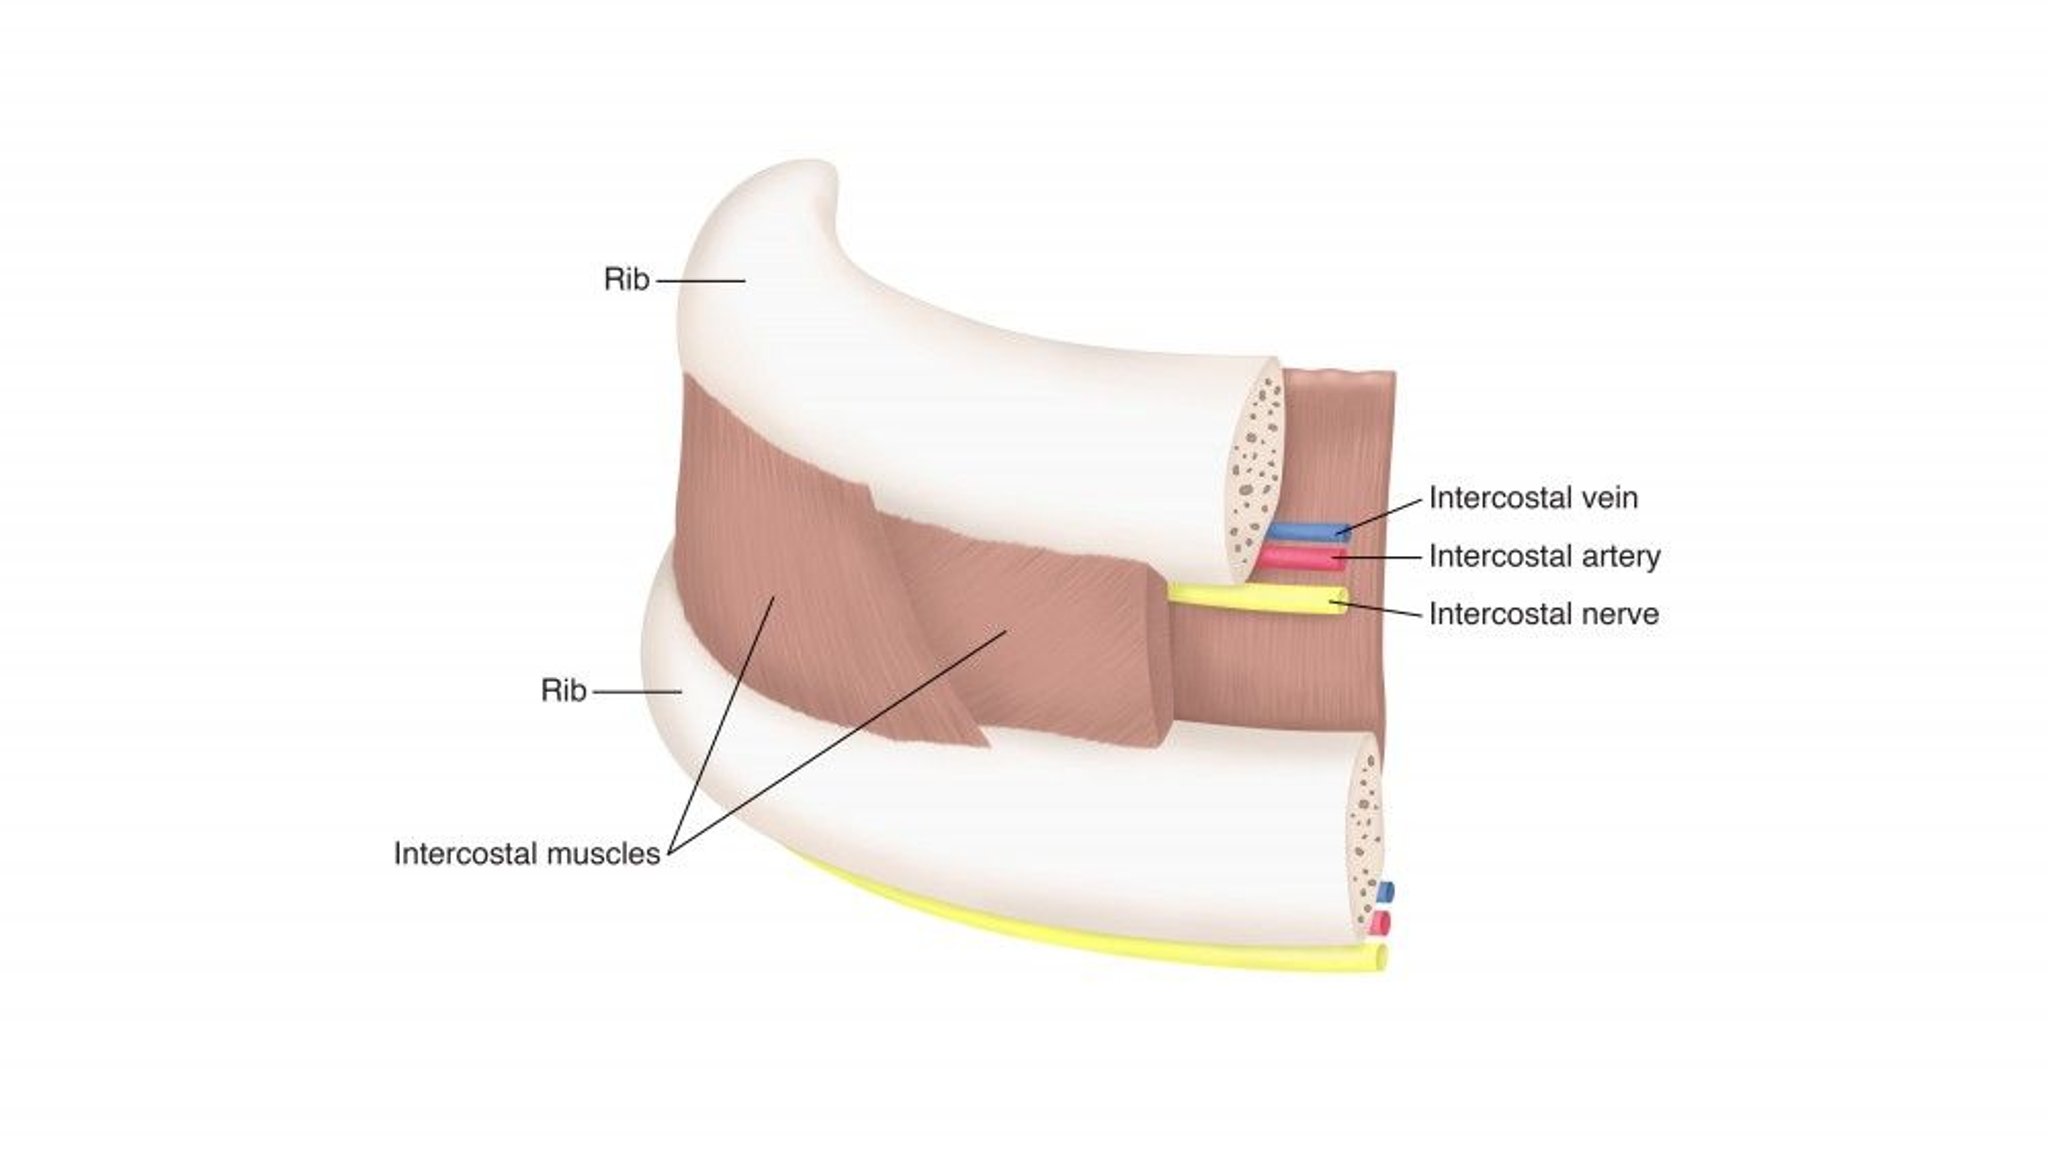
Relevant Anatomy for Thoracentesis
The intercostal neurovascular bundle is located along the lower edge of each rib. Therefore, the needle must be placed over the upper edge of the rib to avoid damage to the neurovascular bundle.
The liver and spleen rise during exhalation and can go as high as the 5th intercostal space on the right (liver) and 9th intercostal space on the left (spleen).

Positioning for Thoracentesis
Best done with the patient sitting upright and leaning slightly forward with arms supported.
Recumbent or supine thoracentesis (eg, in a ventilated patient) is possible but best done using ultrasonography or CT to guide procedure.
Step-by-Step Description of Thoracentesis
Confirm the extent of the pleural effusion by chest percussion and consider an imaging study; bedside ultrasonography is recommended both to reduce the risk of pneumothorax and to increase the success of the procedure (3).
Select a needle insertion point in the mid-scapular line at the upper border of the rib one intercostal space below the top of the effusion.
Using a 25-gauge needle, place a wheal of local anesthetic over the insertion point. Switch to a larger (20- or 22-gauge) needle and inject anesthetic progressively deeper until reaching the parietal pleura, which should be infiltrated the most because it is very sensitive. Continue advancing the needle until pleural fluid is aspirated and note the depth of the needle at which this occurs.
Attach a large-bore (16- to 19-gauge) thoracentesis needle-catheter device to a 3-way stopcock, place a 30- to 50-mL syringe on one port of the stopcock and attach drainage tubing to the other port.
Insert the needle along the upper border of the rib while aspirating and advance it into the effusion.
When fluid or blood is aspirated, insert the catheter over the needle into the pleural space and withdraw the needle, leaving the catheter in the pleural space. While preparing to insert the catheter, cover the needle opening during inspiration to prevent entry of air into the pleural space.
Withdraw 30 mL of fluid into the syringe and place the fluid in appropriate tubes and bottles for testing.
If a larger amount of fluid is to be drained, turn the stopcock and allow fluid to drain into a collection bag or bottle. Alternatively, aspirate fluid using the syringe, taking care to periodically release pressure on the plunger.
If a large amount of fluid (eg, > 500 mL) is withdrawn, monitor patient symptoms and blood pressure and stop drainage if the patient develops chest pain, dyspnea, or hypotension. Coughing is normal and represents lung re-expansion. Some clinicians recommend withdrawing no more than 1.5 L in 24 hours, although there is little evidence that the risk of re-expansion pulmonary edema is directly proportional to the volume of fluid removed (1). Animal data suggest that rapidly draining long-standing effusions may lead to re-expansion pulmonary edema by decreasing surfactant. It may be reasonable for experienced operators to completely drain effusions in one procedure in properly monitored patients.
Remove the catheter while patient is holding breath or expiring. Apply a sterile dressing to the insertion site.
Aftercare for Thoracentesis
Sometimes imaging (usually chest x-ray or ultrasonography) to exclude pneumothorax
Advise patients to report any shortness of breath or chest pain; coughing is common after fluid removal and not a cause for concern.
It has been standard practice to obtain a chest x-ray after thoracentesis to rule out pneumothorax, document the extent of fluid removal, and view lung fields previously obscured by fluid, but evidence suggests that routine chest x-ray is not necessary in asymptomatic patients. Pneumothorax can also be excluded by the presence of lung sliding on multiple interspaces on ultrasonography, but ultrasonography is also not necessary routinely (4). Post-procedural chest imaging is needed for any of the following:
The patient is ventilated
Air was aspirated
The needle was passed more than once
Symptoms or signs of pneumothorax develop
Warnings and Common Errors for Thoracentesis
Be sure to adequately anesthetize the parietal pleura.
Be sure to insert the thoracentesis needle just above the upper edge of the rib and not below the rib, to avoid the intercostal blood vessels and nerves at the lower edge of each rib.
Tips and Tricks for Thoracentesis
When marking the insertion point, use a skin marking pen or make an impression with a pen so that the skin cleansing prep will not remove the mark.
References
1. Feller-Kopman D, Berkowitz D, Boiselle P, et al: Large-volume thoracentesis and the risk of reexpansion pulmonary edema. Ann Thoracic Surg 84:1656–1662, 2007.
2. Hibbert RM, Atwell TD, Lekah A, et al: Safety of ultrasound-guided thoracentesis in patients with abnormal preprocedural coagulation parameters. Chest 144(2):456–463, 2013. doi: 10.1378/chest.12-2374
3. Barnes TW, Morgenthaler TI, Olson EJ, et al: Sonographically guided thoracentesis and rate of pneumothorax. J Clin Ultrasound 33(9): 1656–1661, 2005.
4. Gervais DA, Petersein A, Lee MJ, et al: US-guided thoracentesis: requirement for postprocedure chest radiography in patients who receive mechanical ventilation versus patients who breathe spontaneously. Radiology 204(2):503–506, 1997.