Intraosseous cannulation is the placing of a sturdy needle through cortical bone and into the medullary cavity—to emergently infuse fluids and blood products into critically ill patients.
Intraosseous cannulation has been mostly used in infants and young children, but power drill and spring-loaded devices have been developed for this procedure that facilitate needle insertion through thick cortical bone and have allowed increased use of this method in adults (1).
The procedure is faster and more successful on first attempts than central venous catheterizations and can be performed without interrupting cardiopulmonary resuscitation (2). Fluids reach the central circulation as quickly as with venous infusion. Any fluid or substance routinely given IV (including medication and blood products) may be given by intraosseous infusion.
(See also Vascular Access.)
Indications
As a temporary alternative to venous catheterization when peripheral and central venous access are difficult, particularly in emergency situations (eg, shock, cardiac arrest)
Contraindications
Absolute contraindications:
Bone fracture or recent intraosseous cannulation attempt; infused fluids will extravasate into soft tissues through the cortical defects
Injured inferior vena cava; use sites that drain into the superior vena cava
Relative contraindications:
Infection or burn at needle insertion site
Osteoporosis and osteogenesis imperfecta; bone is easily fractured during procedure
Complications
Complications are uncommon and include:
Extravasation of fluid into soft tissues (poor control during insertion results in the needle either not entering the bone; exiting the opposite cortex; or creating a too-large, leaky hole in the cortex)
Bleeding, causing compartment syndrome
Infection (osteomyelitis following intraosseous cannulation is rare) (3, 4)
Skin sloughing
Fat embolism
Growth-plate damage has not been reported.
Equipment
Antiseptic solution (eg, chlorhexidine, povidone-iodine, isopropyl alcohol)
Towels (rolled up)
Gloves
Intraosseous needles and sometimes insertion device
Syringes, 5 to 60 mL, based on anticipated need
Sterile saline, for flushes
Sterile gauze (eg, 10 cm × 10 cm squares)
IV connection tubing and fluids
Intraosseous needles have a stylet and usually an adjustable guard to control depth. Typically, 25-mm or 45-mm long intraosseous needles are used for adult patients, depending on skin and subcutaneous tissue thickness at the insertion site, and 15-mm long needles are used for pediatric patients. The needles may be available as part of a commercial kit with a powered insertion device similar to a cordless screwdriver/drill. Follow the manufacturer's instructions for choosing the appropriate size needle.
Optional equipment (if patient is conscious and clinical situation allows time for administration of local anesthetic):
Local anesthetic (1% lidocaine without epinephrine, a 25- or 22-gauge needle, a 3- or 5-mL syringe)
Intramedullary anesthetic (2% lidocaine, preservative-free IV solution)
Additional Considerations
Ensure patient does not have hypersensitivity to antiseptic solution being used.
A sterile field is usually not needed for peripheral venous cannulation. However, intraosseous cannulation has a higher risk of infection and sterile (ie, aseptic or aseptic no-touch) technique should be used.
Relevant Anatomy
Insertion sites for adults:
The distal tibia is the preferred site for manual insertion. The needle is inserted on the medial surface of the tibia at the junction of the medial malleolus and the shaft of the tibia, posterior to the greater saphenous vein.
The proximal humerus is an alternate site. It has the potential advantage, during shock or cardiac arrest, of being closer to the central circulation. The insertion site is at the greater tuberosity, with the patient’s arm adducted and the palm pronated and resting over the umbilicus.
The proximal tibia can be used in adults, but because the bone is thick, a powered device is preferred for cannulation. The needle is inserted into the flat anteromedial surface 2 cm distal to the tibial tubercle.
Other sites (iliac crest, femur, radius, clavicle, calcaneus, and sternum) may be used if necessary.
Insertion sites for children:
In children < 6 years old, the proximal tibia is the preferred site. The needle is placed on the broad, flat anteromedial surface 1 to 3 cm distal to the tibial tubercle.
The distal femur is an alternate site. The needle is inserted 2 to 3 cm above the lateral femoral condyle, in the midline and angled 10 to 15 degrees cephalad. The thick overlying soft tissue and muscle may make it difficult to palpate the bony landmarks in this location.
For older children, the medial surface of the distal tibia 2 cm above the medial malleolus may be easier.
Positioning
Position the patient supine.
Place a towel roll behind the knee so that the knee is slightly flexed if the proximal tibia or distal femur is to be cannulated.
Step-by-Step Description of Procedure
Prepare the equipment and the insertion site
Pre-flush all IV lines and connecting tubes with normal saline.
Put on gloves, face mask, face shield, and other personal protective equipment as needed.
Prepare a syringe with 5 to 10 mL sterile saline in it.
For insertion-site anesthesia, draw 3 to 5 mL of 1% lidocaine into a syringe and attach the 25-gauge needle.
For medullary space anesthesia, draw 3 to 5 mL of 2% preservative-free IV lidocaine into a syringe.
Prepare the manual needle or the power drill (eg, screw the stylet securely into the needle and attach the assembly to the drill, and set any insertion depth limiters appropriately to the patient’s age and size).
Swab the skin around the cannulation site with antiseptic solution, using outwardly expanding concentric circles. For children, include both the proximal tibia and distal femur in the swabbed area.
Allow the antiseptic solution to dry for at least 1 minute.
Anesthetize the needle insertion site
For a conscious patient:
Inject 3 to 5 mL of 1% lidocaine into the skin and soft tissues along the anticipated needle insertion path, including the periosteum.
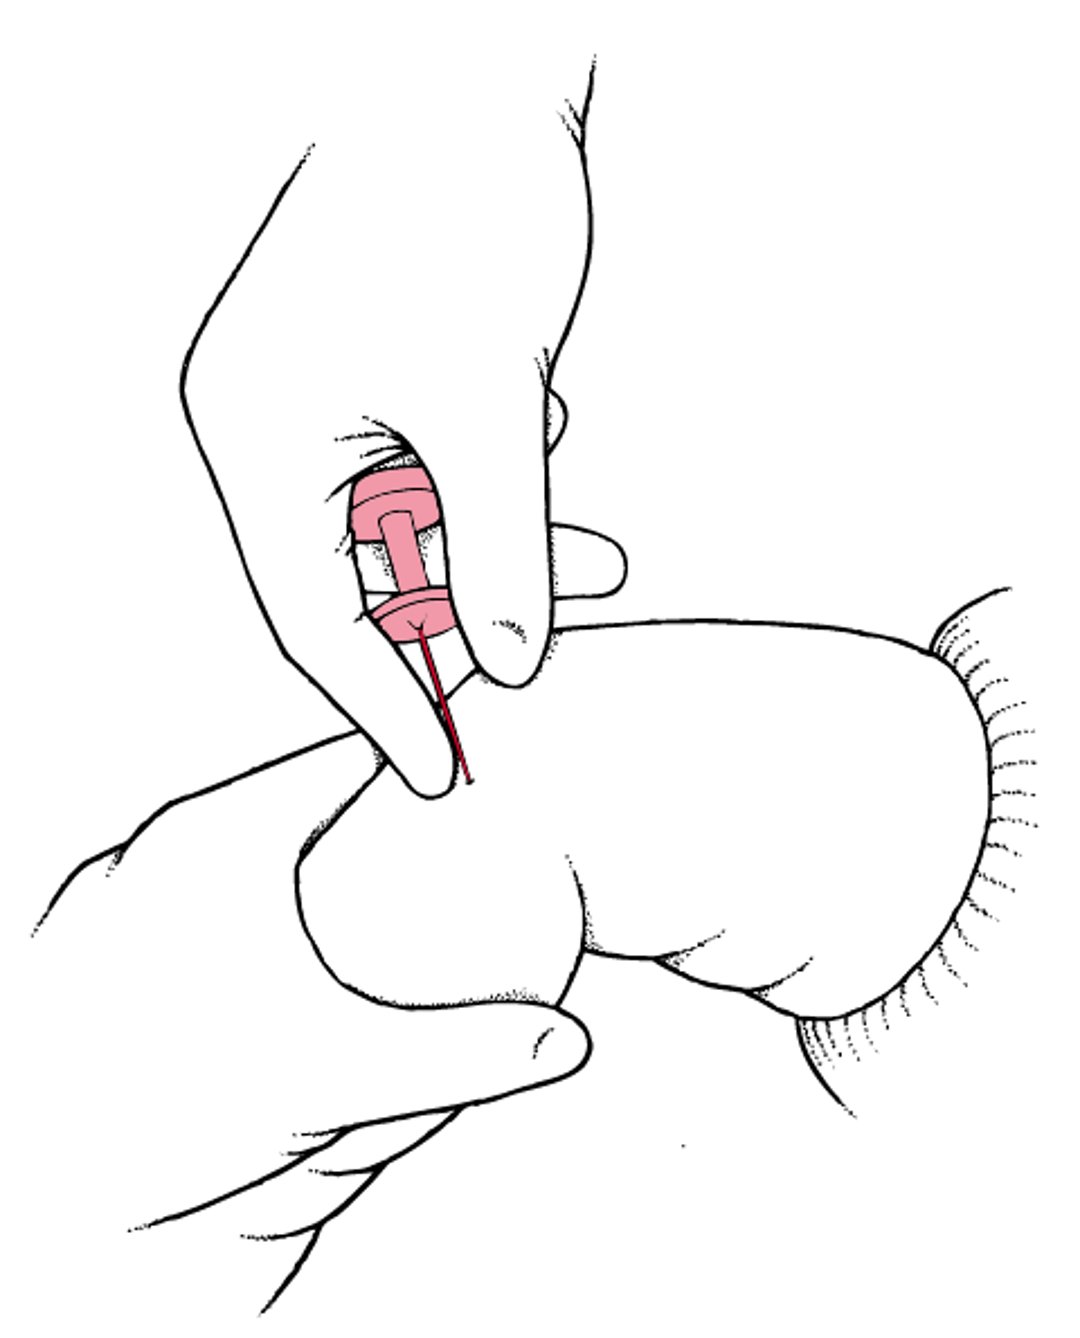
Intraosseous (IO) needle insertion
The physician’s fingers and thumb are wrapped around the proximal tibia to stabilize it; the hand should not be placed directly behind the insertion site (to avoid self-puncture). Instead, a towel may be placed behind the knee to support it. The physician holds the needle firmly in the palm of the other hand, directing the point slightly away from the joint space and growth plate. The needle is inserted with moderate pressure and a rotary motion, which is stopped as soon as a pop indicates penetration of the cortex. Some needles have a plastic sleeve, which can be adjusted to prevent them from being pushed too deeply into or through the bone. |

Insert the intraosseous needle
Palpate the insertion site with your nondominant hand.
Stabilize the insertion site, by wrapping your nondominant hand around the extremity near the site. Do not place your hand directly behind the insertion site (to avoid self-puncture).
Firmly hold the drill or the manual needle in your dominant hand.
Position the needle tip at the point of insertion, perpendicular to the long axis of the bone.
Point the needle slightly (10 to 15 degrees) away from the joint space and growth plate.
Manual insertion:
Stabilize the needle shaft at the skin surface with an index finger, to help you stop the needle's advance once the cortex is penetrated. Some needles have an adjustable plastic sleeve for this purpose.
Advance the needle with moderate pressure and an alternating clockwise and counterclockwise rotary, coring motion. Advance along a straight path, so that the hole will be as narrow as possible (to prevent fluid extravasation).
Stop advancing the needle when you feel the pop (sudden loss of resistance) that indicates penetration through the cortex and into the medullary space, to prevent the needle from being pushed too deeply into, or through, the bone.


Insertion using a power drill:
Penetrate the skin. Squeeze the trigger of the drill (only a device approved for this specific medical use should be utilized), and apply gentle pressure to penetrate the skin.
Advance the needle. Continue to squeeze the trigger while applying steady, downward pressure against the resistance of the cortical bone.
Immediately release the trigger and stop advancing the needle when you feel the sudden loss of resistance that indicates entry into the medullary space.
Detach the drill from the needle, keeping the needle in place.

Confirm intramedullary needle placement
Seeing the needle remaining upright without support is the first sign of proper needle placement.
Remove the cap and the stylet, attach pre-flushed extension tubing, and aspirate. Free return of blood (marrow) confirms correct intramedullary placement.
If no marrow is aspirated, push 5 to 10 mL of normal saline through the needle.
If you feel resistance to the push and see or palpate local swelling (extravasation), remove the needle and cannulate another bone.
Begin intramedullary infusion
Begin intramedullary infusion (instill intramedullary anesthesia, if necessary)
Because intramedullary infusion sometimes causes discomfort, to provide analgesia for a conscious patient: In adults, slowly (over 2 to 3 minutes) infuse 2 mL of 2% preservative-free IV lidocaine (40 mg), may repeat 20-mg doses until pain stops (maximum total dose 100 mg [5 mL]). For children, slowly infuse 0.5 mg/kg (0.025 mL/kg) for a maximum of 20 mg (1 mL).
Wait 1 minute, and then flush with 5 to 10 mL of normal saline.
Begin the infusion. IV fluid should flow freely without extravasating into surrounding tissues. If fluid extravasates, remove needle and cannulate another bone.
Dress the site
Wrap sterile gauze about the needle entry site and securely tape in place; commercial intraosseous kits may contain specialized dressings.
If needed, immobilize the extremity to further protect the site.
Aftercare for Intraosseous Cannulation
For recurring medullary pain from the infusion, repeat the slow 2% lidocaine infusion and saline flush as described above, using one-half of the initial lidocaine dose every hour as needed.
Intraosseous delivery systems should be removed as soon as practical after peripheral or central IV access has been achieved and within 24 hours of insertion (ideally within 3 to 4 hours). Pull out the needle using a steady clockwise rotation. Attach a locking cap or an empty syringe to the needle hub to afford a better grip if needed.
After needle removal, apply a sterile occlusive dressing. Chlorhexidine-impregnated discs at the insertion point and transparent membrane dressings are commonly used.
Warnings and Common Errors for Intraosseous Cannulation
When the tip of the intraosseous needle first contacts the bone surface, at least 5 mm of the needle should be visible outside the skin so that the needle tip will be able to reach the marrow cavity. If the needle does not extend that far, a longer needle may be needed.
Avoid drilling until the needle hub is flush with, or indenting into, the skin surface. The needle hub can cause damage and skin necrosis where it touches the skin.
Tips and Tricks for Intraosseous Cannulation
Rapid infusion of crystalloids (eg, normal saline) as well as infusion of viscous fluids should be done using a pressure bag, manual injection, or an infusion pump.
References
1. Weiser G, Hoffmann Y, Galbraith R, Shavit I. Current advances in intraosseous infusion - a systematic review. Resuscitation 2012;83(1):20-26. doi:10.1016/j.resuscitation.2011.07.020
2. Dumas RP, Vella MA, Maiga AW, et al. Moving the needle on time to resuscitation: An EAST prospective multicenter study of vascular access in hypotensive injured patients using trauma video review. J Trauma Acute Care Surg 2023;95(1):87-93. doi:10.1097/TA.0000000000003958
3. Hoskins M, Sefick S, Zurca AD, Walter V, Thomas NJ, Krawiec C. Current utilization of interosseous access in pediatrics: a population-based analysis using an EHR database, TriNetX. Int J Emerg Med 2022;15(1):65. doi:10.1186/s12245-022-00467-9
4. Petersen LB, Bogh SB, Hansen PM, et al. An assessment of long-term complications following prehospital intraosseous access: A nationwide study. Resuscitation 2025;206:110454. doi:10.1016/j.resuscitation.2024.110454
Drug Information for the Topic