Ankle splints are rigid devices fastened to the ankle and used to maintain stability of the ankle joint.
Ankle splints are typically used for injuries that benefit from immobilization but do not require casting. Commercial immobilizer boots are an alternative where available. Unlike boots, most posterior ankle splints are not designed to bear weight or be removed and replaced (eg, for bathing).
Indications for a Posterior Ankle Splint
Injuries (eg, open or unstable fractures, dislocation) requiring immediate operative intervention (for temporary immobilization)
Stable (eg, minimally displaced) fractures of the distal tibia and/or fibula (eg, minimally displaced fractures of the distal tibia and/or fibula)
Ankle sprains that should not bear weight
Ankle dislocations (for postreduction stabilization)
Selected foot fractures (eg, metatarsal fractures, tarsal fractures)
Achilles tendon rupture; the foot should be placed in an equine position while applying the splint
Contraindications to a Posterior Ankle Splint
Absolute contraindications:
None
Relative contraindications:
Injuries (eg, certain mild sprains) in which immediate range of motion and/or weight-bearing is desirable
Injuries in which a cast is preferable*
* The indications for posterior splints and casts overlap (see also Overview of Fractures). Even if casting is the definitive treatment, initial splinting is often recommended for some injuries until swelling subsides. For definitive management, a cast may be preferred when weight-bearing is permitted and when the ankle clearly must be immobilized for > 1 to 2 weeks. Conversely, immobilization boots may be preferred when continual immobilization is not required (eg, removal for bathing is permitted).
Complications of a Posterior Ankle Splint
Thermal injury (caused by the exothermic reaction between plaster or fiberglass and water)
Excessive pressure causing skin sores and/or ischemic injury
Equipment for a Posterior Ankle Splint
Stockinette (enough to cover the area from above the fibular head to past the metatarsal heads)
Roll padding (eg, cotton roll) 10-cm (4-inch) width
Plaster or fiberglass splinting material*, 10- to 15-cm (4- to 6-inch) width—wide enough to cover posterior surface of leg and malleoli and long enough to reach from the fibular head to the metatarsal heads
Elastic bandage, usually 10-cm (4-inch) width
Lukewarm water and bucket or other container
Nonsterile gloves
* Fiberglass and plaster are usually supplied as single-layer rolls, but there are also commercially available rolls of pre-constructed splints that include multiple layers of fiberglass/plaster as well as padding.
Additional Considerations for a Posterior Ankle Splint
For unstable ankle injuries, combining an ankle stirrup (sugar-tong splint) and posterior ankle splint can increase the stability of immobilization.
A posterior leg splint used to immobilize an Achilles tendon rupture should place the ankle in the equine position.
Any open wounds should be treated and covered appropriately prior to application of the knee immobilizer.
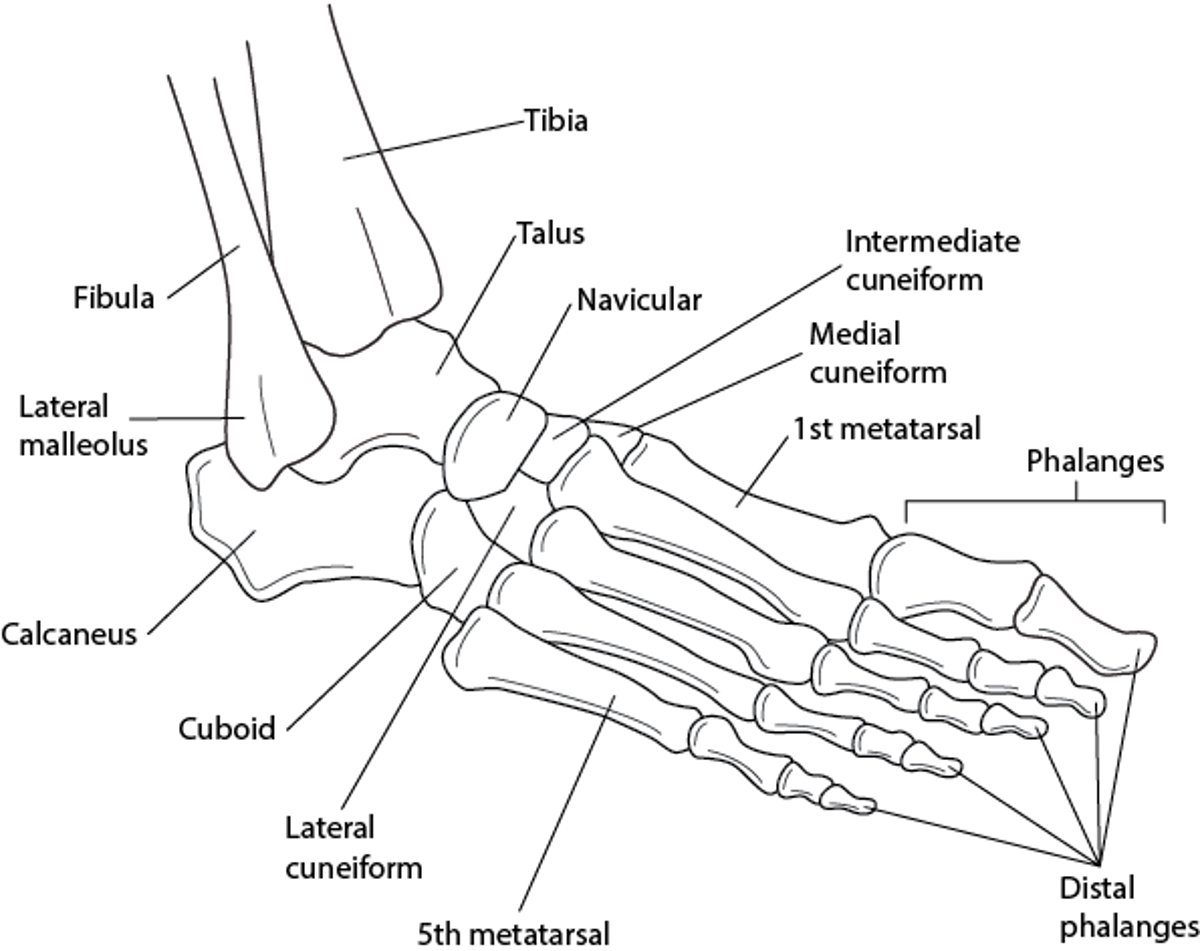
Relevant Anatomy for a Posterior Ankle Splint
The splint should cover the length of most of the lower leg and reach the metatarsal heads.
Bones of the Ankle and Foot

Positioning for a Posterior Ankle Splint
The patient should lie prone with the knee flexed or sit with the lower leg dangling over the edge of the bed.
Maintain the ankle at 90° of flexion.
Step-by-Step Description for Applying a Posterior Ankle Splint
Wear nonsterile gloves.
Give the patient adequate analgesia.
Apply stockinette, covering the area from the fibular head to the midfoot, past the metatarsal heads.
Wrap the padding from the metatarsal heads to the lower leg just proximal to the fibular head, slightly beyond the area to be covered by the splint material; overlap each turn by half the width of the padding and periodically tear the wrapping across its width to decrease the risk of tissue compression over the thicker part of the extremity (eg, as you move proximally up the lower leg, tear the edge of the padding closest to the knee to prevent tension from developing and to allow the wrapping to lay flat).
Smooth the padding as necessary.
Lay out a length of splint material matching the distance from the posterior lower leg just below the fibular head to the plantar surface of the foot at the metatarsal heads—it should be just shorter than the area covered by the padding.
Unroll additional splint material, folding it back and forth along the first length until there are 8 to 10 layers (when using single-layer rolls).
Alternatively, if using ready-made splint material, cut a single piece to the above length.
Immerse the splinting material in lukewarm water.
Squeeze excess water from the splinting material (do not wring out plaster).
Apply the splint material to the back of the leg from just below the fibular head to the metatarsal heads.
Smooth out the splinting material using your palms rather than your fingertips to conform to the contour of the lower leg and ankle and fill in the interstices in the material.
Wrap the elastic wrap over the splinting material distally to proximally and overlap each revolution by half the width of the elastic wrap.
Fold the extra stockinette and cotton padding over the edges of the splinting material.
Maintain the ankle at 90° of flexion until the splinting material hardens.
Check distal neurovascular status (eg, capillary refill, distal sensation, toe flexion and extension).

Aftercare for a Posterior Ankle Splint
Provide crutches and training on their use.
Advise the patient to keep the splint dry.
Arrange or recommend appropriate follow-up.
Have the patient elevate the injured limb above the heart while seated or at rest.
Have the patient seek care if pain is not controlled by oral medications at home.
Warnings and Common Errors for a Posterior Ankle Splint
Be sure not to let the ankle joint relax while the splint hardens so that the 90° flexion angle is lost.
Ensure padding and elastic wraps are not applied too tightly.
Avoid irregular contours and potential pressure spots by using the palms of your hands rather than the fingertips to smooth out the splinting material.
Tips and Tricks for a Posterior Ankle Splint
When using plaster splints, warm water makes the plaster set quicker, so if you are unfamiliar with applying splints use cooler water to increase your working time.
Because the exothermic reaction between fiberglass and water produces more heat than it does between plaster and water, lukewarm water is preferred for fiberglass.
To maintain the ankle at 90°, the foot may be supported against the operator's abdomen while the patient is lying down.