Endotracheal (ET) tubes are flexible tubes with a standard flange for attaching an oxygen source at the proximal end and a beveled tip and inflatable balloon cuff at the distal end. Under visualization, using either direct laryngoscopy or one of various types of video laryngoscopy, the ET tube is inserted into the mouth and directed into the trachea (orotracheal intubation). Less commonly, the ET tube is inserted into the nose (nasotracheal intubation).
(See also Tracheal Intubation, as well as Airway and Respiratory Devices, Airway Establishment and Control, How To Do Head Tilt-Chin Lift and Jaw Thrust Maneuvers, and How To Do Bag-Valve-Mask Ventilation.)
Endotracheal tubes are the definitive method of airway management for most patients with apnea or severe ventilatory failure.
Orotracheal intubation was traditionally performed using direct laryngoscopy. However, video laryngoscopy is frequently used as the first-line method for endotracheal intubation as it provides better visualization of the glottis than direct laryngoscopy. A video laryngoscope has a small camera on the end of a laryngoscope blade that transmits an image to a screen that may be incorporated into the device handle or separate from the device.
Indications for Orotracheal Intubation Using Video Laryngoscopy
Orotracheal intubation, with or without the assistance of video laryngoscopy, is indicated for patients with:
Hypoxia or hypoventilation requiring assisted ventilation to maintain oxygenation and ventilation
Apnea or impending respiratory arrest (initial emergency treatment)
Elective anesthesia
Need for prolonged mechanical ventilation
Situations where bag-valve-mask ventilation is difficult or impossible (eg, in patients with severe facial deformity, thick beard, or other factors that interfere with the face mask seal) or there is upper airway obstruction due to soft tissues
Need to prevent aspiration (eg, in patients who are obtunded or comatose) or for repeated airway suctioning
Video assistance should be used when available, and it is particularly useful when anatomic factors make direct laryngoscopy difficult and/or when injuries preclude the head and neck movement typically required for proper positioning.
Contraindications for Orotracheal Intubation Using Video Laryngoscopy
Absolute contraindications:
There is no medical contraindication to providing ventilatory support to a patient; however, a legal contraindication (do-not-resuscitate order or specific advance directive) may be in force
Restricted mouth opening that blocks tube insertion (nasotracheal intubation or a surgical airway would be indicated in this case)
Impassable upper airway obstruction (surgical airway would be indicated in this case)
Relative contraindications:
Consciousness or presence of a gag reflex (patients should be unconscious or receive one or more medications to aid intubation before ET tube insertion)
If orotracheal intubation is not contraindicated, there are no additional contraindications to the use of video assistance. If there is significant blood, secretions, or emesis in the oropharynx that may obscure the camera, direct laryngoscopy may provide a better view than video laryngoscopy.
Complications of Orotracheal Intubation Using Video Laryngoscopy
Complications include:
Dental or oropharyngeal soft tissue trauma during tube insertion
Vomiting and aspiration during tube insertion
Incorrect tube placement (eg, esophageal intubation)
Hypoxia during the intubation attempt
Equipment for Orotracheal Intubation Using Video Laryngoscopy
Gloves, mask, gown, and eye protection (ie, universal precautions)
Syringe for balloon cuff inflation
Sterile water-soluble lubricant or anesthetic jelly
Endotracheal tube, appropriately sized to patient
Gum elastic bougie
Video laryngoscope
Rigid stylet (specific to model of video laryngoscope being used)
Suctioning apparatus, rigid suction catheter, and Magill forceps, to clear the pharynx as needed
Bag-valve-mask apparatus
Oxygen source (100% oxygen, 15 L/minute)
Pulse oximeter and appropriate sensors
Capnometer (end-tidal carbon dioxide monitor)
Medications to aid intubation (typically an induction agent and a paralytic to enable rapid sequence intubation)
Ventilation face mask, oropharyngeal/nasopharyngeal airways, appropriately sized to patient
Nasogastric tube
In case laryngoscopy fails, equipment to insert a supraglottic airway or perform a cricothyrotomy
If a video laryngoscope is not available, use a standard direct laryngoscope with a curved or straight blade.
Additional Considerations for Orotracheal Intubation Using Video Laryngoscopy
Optimally, each attempt at endotracheal intubation should last no longer than 30 seconds, preceded by pre-oxygenation.
During intubation attempts, if oxygen saturation falls below 90%, interim bag-valve-mask ventilation may be needed (see bag-valve-mask ventilation).
Relevant Anatomy for Orotracheal Intubation Using Video Laryngoscopy
Aligning the external auditory canal with the sternal notch should align the airway axis to provide an optimal view of the airway.
The degree of head elevation that best aligns the ear and sternal notch varies (eg, none in children because the occiput is relatively large; a large degree in patients with obesity).
Positioning for Orotracheal Intubation Using Video Laryngoscopy
The sniffing position is often used during direct laryngoscopy to improve airway visualization and endotracheal tube insertion; however, it is unclear whether the sniffing position is better than the neutral position for increasing intubation success during video laryngoscopy, so either position is appropriate (1).
The sniffing position is used only in the absence of a cervical spine injury:
Position the patient supine on the stretcher.
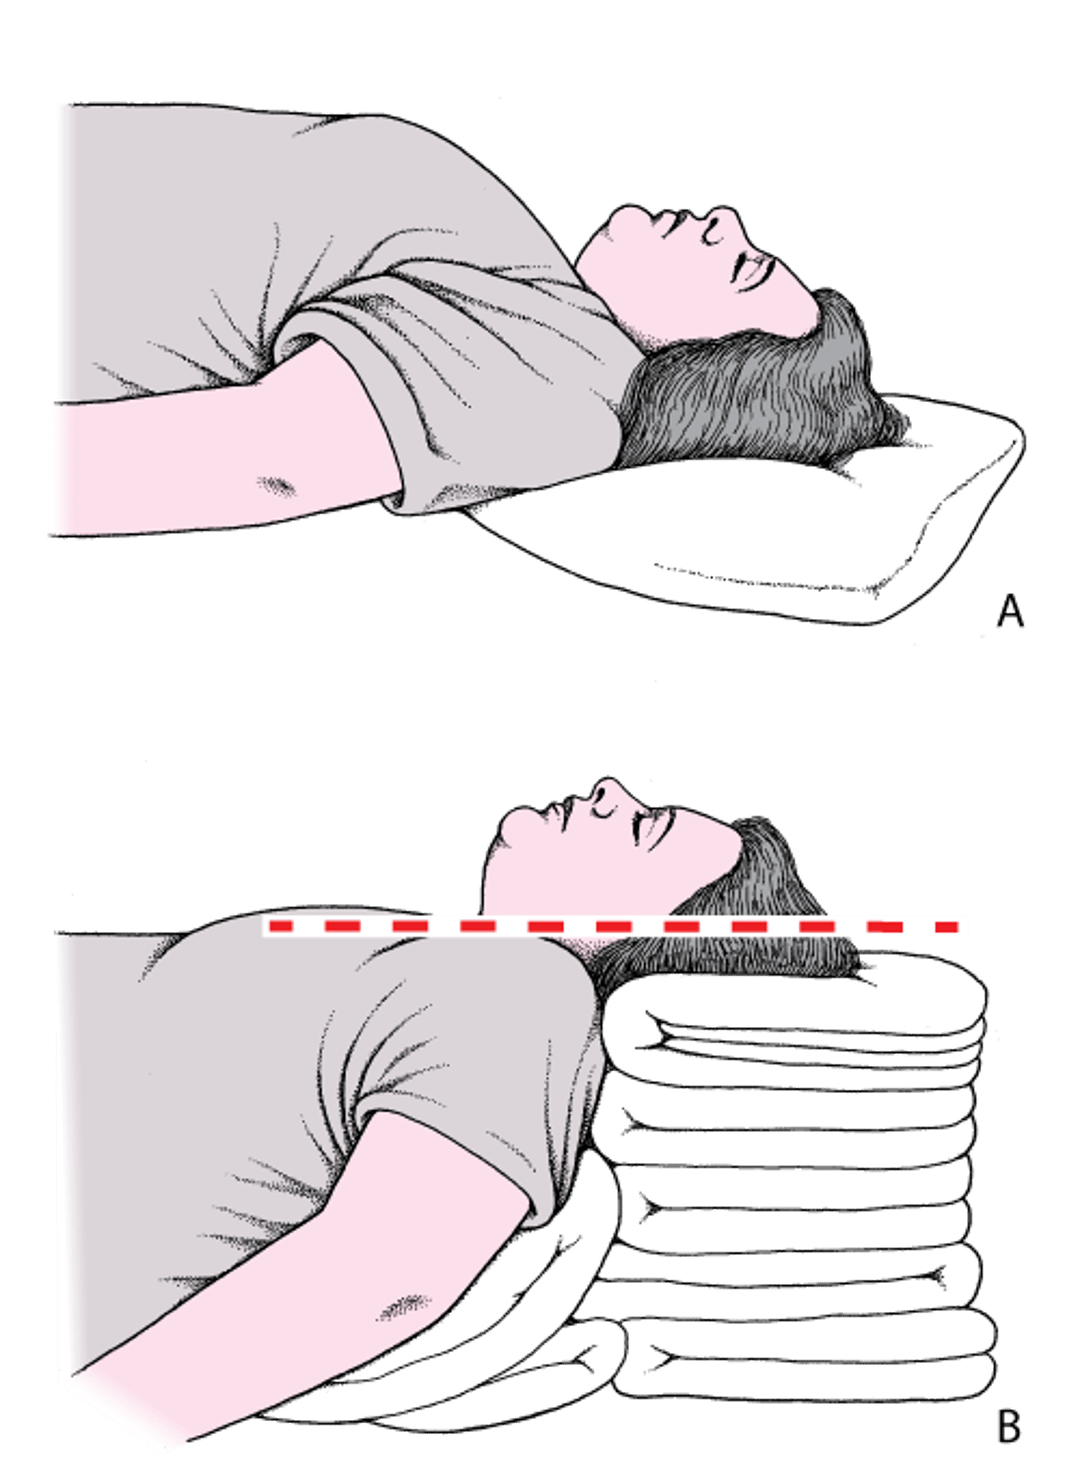
Place folded towels or other materials under the head, neck, and shoulders, flexing the neck so as to elevate the head until the external auditory meatus lies in the same horizontal plane as the sternal notch. Then tilt the head so that the face aligns on a parallel horizontal plane; this second plane will be above the first. In patients with obesity, many folded towels or a commercial ramp device may be needed to sufficiently elevate the shoulders and neck (see figure ).
Head and Neck Positioning to Open the Airway
A: The head is flat on the stretcher; the airway is constricted. B: Establishing the sniffing position, the ear and sternal notch are aligned, with the face parallel to the ceiling, opening the airway. Adapted from Levitan RM, Kinkle WC: The Airway Cam Pocket Guide to Intubation, ed. 2. Wayne (PA), Airway Cam Technologies, 2007. |

If there is a potential cervical spine injury:
Position the patient supine or at a slight incline on the stretcher.
Maintain in-line stabilization to avoid moving the neck and use only the jaw thrust maneuver or chin lift without head tilt to manually facilitate opening of the upper airway.
Step-by-Step Description of Orotracheal Intubation Using Video Laryngoscopy

Maneuvers to create a patent airway and to ventilate and pre-oxygenate the patient are always indicated before attempting tracheal intubation. Once a decision to intubate has been made, do the following:
Prepare the necessary equipment, including ancillary equipment such as a suction device. Be prepared to use an alternate technique (eg, laryngeal mask airway, bag-valve-mask ventilation, or surgical airway [cricothyrotomy]) if laryngoscopy fails.
Correctly position the patient (see figure Head and neck positioning to open the airway and manual maneuvers).
Establish IV access.
Ventilate and pre-oxygenate the patient with 100% oxygen (oxygenation with a non-rebreather mask is adequate if the patient is spontaneously breathing; if the patient does not have adequate spontaneous ventilations, use bag-valve-mask ventilation with supplemental passive nasal cannula [or high-flow nasal cannula if available]).
Turn on the video laryngoscope and verify the light and camera are working.
Inflate the balloon cuff of an appropriately sized endotracheal tube to verify it does not leak then deflate it.
Insert rigid stylet into endotracheal tube
Ensure the patient is positioned to optimize a patent airway.
Perform rapid sequence intubation (ie, using medications to aid intubation). If the airway is anticipated to be difficult, consider delayed sequence intubation or awake intubation techniques.
Clear the oropharynx, if necessary, of obstructing secretions, vomitus, or foreign material.
Continue oxygenation. For spontaneously breathing patients, apply a non-rebreather mask at 100% fraction of inspired oxygen (FiO2) for 3 to 5 minutes before intubation. For patients who are not spontaneously breathing, give about 8 vital capacity breaths at maximum oxygen concentration using a bag-valve-mask apparatus.
Insert the video laryngoscope blade into the patient's mouth, following the curve of the tongue. Once the tip of the video laryngoscope blade is behind the patient's tongue, look at the video laryngoscope monitor and manipulate the blade so the glottic opening is in the middle of the upper half of the video screen.
Optimize the view with bimanual laryngoscopy. This is accomplished by manipulating the larynx with the operator's right hand while operating the video laryngoscope with the left hand. Applying backwards, upward, and rightward pressure on the thyroid cartilage will usually optimize the view. The operator can position an assistant's hand to maintain the view while inserting the endotracheal tube.
Looking away from the screen and back at the patient, insert the endotracheal tube in the right side of the mouth and pass it behind the tongue, carefully avoiding damaging the balloon on the teeth. At this point, watch the monitor to guide the tip of the tube through the vocal folds. Because some stylets used with certain video laryngoscopes are rigid, this maneuver may require having an assistant pull the stylet out 1 to 2 cm while the tube is gently advanced. Then advance the tube such that the balloon cuff is 1 to 2 cm past the vocal folds.
Inflate the cuff and fully remove the stylet.
Ventilate the patient (8 to 10 breaths/minute, each about 6 to 8 mL/kg or 500 mL and lasting about 1 second).
If unable to intubate, use of adjuncts such as the bougie may be helpful. If adjunct use does not result in a successful airway, quickly pursue an alternate airway, which may involve rescue bag-valve-mask ventilation as an interim either to a supraglottic airway (eg, laryngeal mask airway, laryngeal tube, esophageal-tracheal double lumen tube) or cricothyrotomy.
Aftercare for Orotracheal Intubation Using Video Laryngoscopy
Obtain a chest radiograph to verify proper placement of the endotracheal tube.
Warnings and Common Errors for Orotracheal Intubation Using Video Laryngoscopy
It is imperative to use the appropriate rigid stylet designed for the curvature of a specific video laryngoscope so it follows the curvature of the blade. Use of traditional malleable stylets may result in a failed intubation attempt, especially on anterior airways.
When removing the stylet, securely hold the endotracheal tube while an assistant pulls the stylet out, rotating the stylet handle caudally toward the chest, not pulling straight upward, to facilitate easier removal of the stylet and minimizing the risk of dislodging the endotracheal tube.
All cuffs, adult or pediatric, should be inflated only to the extent necessary to prevent movement; overinflation can lead to soft tissue necrosis.
Tips and Tricks for Orotracheal Intubation Using Video Laryngoscopy
With difficult airways, use of traditional intubation techniques such as sweeping the tongue toward the left and applying slight upward and outward elevation of the laryngoscope handle can help facilitate a better view.
If an assistant is available, have the assistant insert a finger into the mouth and pull the cheek laterally; this may provide easier access for inserting the endotracheal tube into the mouth.
When looking at the video screen after inserting the endotracheal tube into the mouth, focus on the vocal folds. The view of the vocal folds should be lost only for a brief moment while the tube passes through the folds.
The video laryngoscope may also be used to more easily place an orogastric tube after intubation, particularly in patients with difficult anatomy.
Reference
1. Mendonca C, Ungureanu N, Nowicka A, Kumar P. A randomised clinical trial comparing the 'sniffing' and neutral position using channelled (KingVision® ) and non-channelled (C-MAC® ) videolaryngoscopes. Anaesthesia. 2018;73(7):847-855. doi:10.1111/anae.14289