Arthrocentesis of the knee is the process of puncturing the knee (tibiofemoral and patellofemoral) joint with a needle to withdraw synovial fluid.
(See also Evaluation of the Patient with Joint Symptoms and Evaluation of the Knee.)
Indications for Knee Arthrocentesis
Diagnosis of the cause of a synovial effusion (eg, infection, crystal-induced arthritis)
Removal of a synovial effusion and/or injection of medications as part of treatment and for pain relief
Contraindications to Knee Arthrocentesis
Absolute contraindications
Infection of skin or deeper tissues at the anticipated site of needle insertion
If possible, an alternate, uninfected puncture site should be used. However, acutely inflamed joints may be generally warm, tender, and erythematous, thus mimicking extra-articular infection and making it hard to find an uninvolved insertion site. Ultrasound may be helpful; visualization of a joint effusion by ultrasound can reinforce the decision to perform arthrocentesis despite surrounding erythema. NOTE: If infectious arthritis is strongly suspected, arthrocentesis should be performed regardless of erythema or negative ultrasound results because joint infection must not be missed.
Relative contraindications
Severe bleeding diathesis, which may need to be corrected before arthrocentesis; routine therapeutic anticoagulation is not a contraindication (1, 2), particularly if infection is suspected
Prosthetic joint, which is susceptible to iatrogenic infection; prosthetic joint arthrocentesis should generally be performed by an orthopedic surgeon
Complications of Knee Arthrocentesis
Complications are uncommon and include:
Infection
Damage to tendon, nerve, or blood vessels (traumatic tap)
Equipment for Knee Arthrocentesis
Antiseptic solution (eg, chlorhexidine, povidone iodine, isopropyl alcohol), sterile gauze, and gloves
Nonsterile underpads
Local anesthetic (eg, 1% lidocaine, 25- to 30-gauge needle, 3- to 5-mL syringe)
For joint aspiration, a 51-mm (2-inch) 18- or 20-gauge needle and 20- to 60-mL syringe
For large effusions, multiple syringes, plus either a hemostat or a three-way stopcock, may be needed
Appropriate containers for collection of fluid for laboratory tests (eg, cell count, crystals, cultures)
For intra-articular therapeutic injection, a syringe containing a glucocorticoid(eg, triamcinolone acetonide 20 to 40 mg or methylprednisolone acetate 40 to 80 mg) and/or a long-acting anesthetic (eg, 0.25% bupivacaine), a 23- to 25-gauge needle, and a hemostat to help switch syringes, if needed
Additional Considerations for Knee Arthrocentesis
Standard precautions, including the use of a sterile technique, is necessary to prevent microbial contamination of both the joint space and the aspirated synovial fluid.
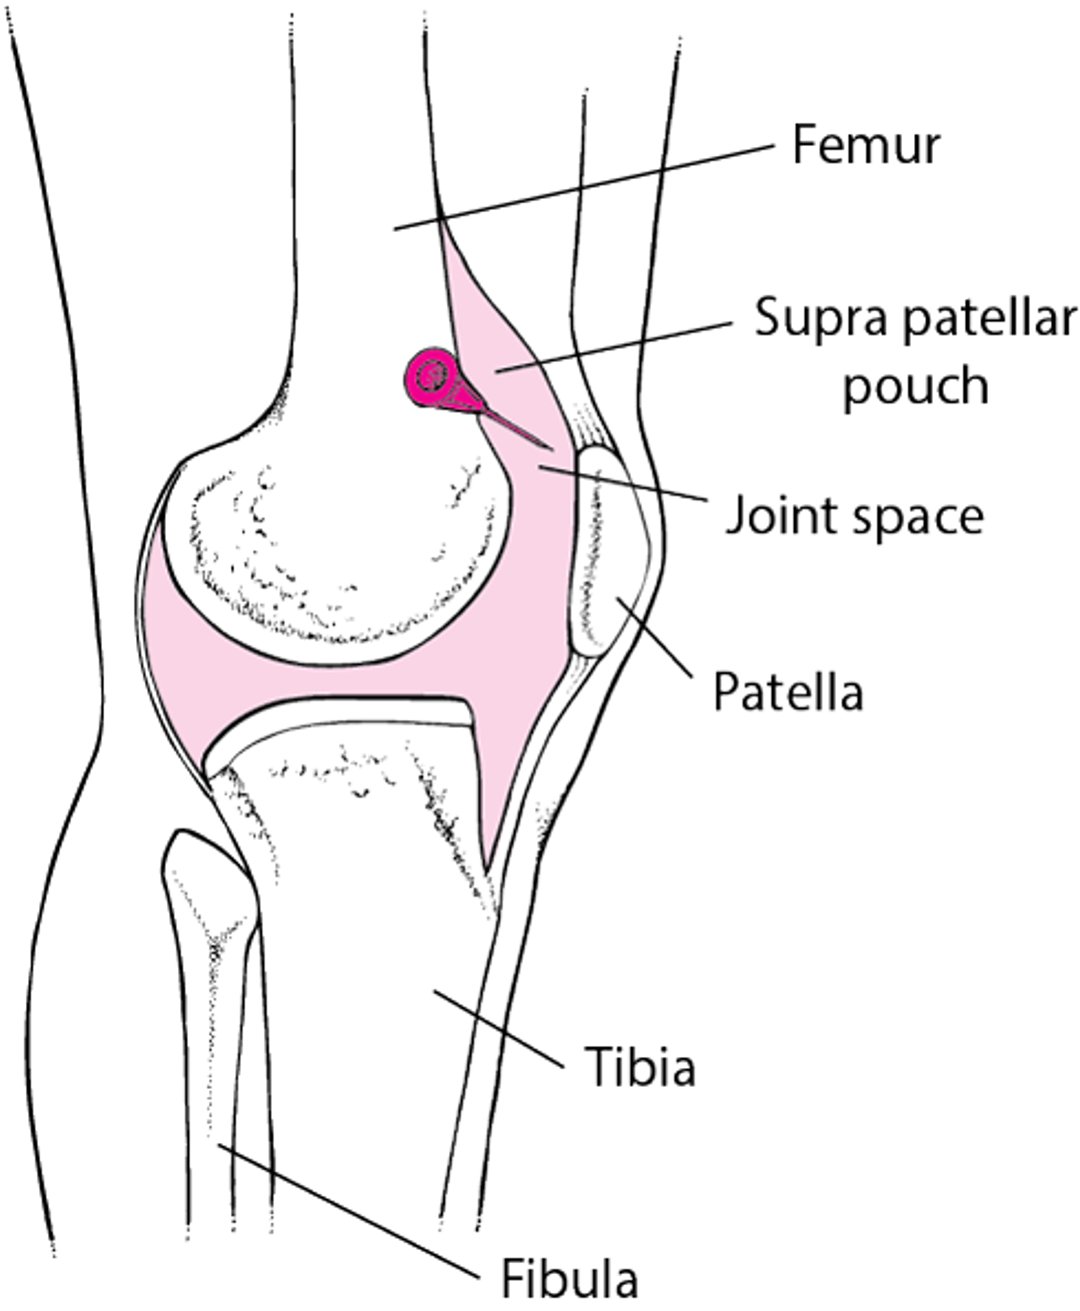
Relevant Anatomy for Knee Arthrocentesis
When using the anteromedial approach, the needle enters 1 to 2 cm medial to the superior half or third of the patella. A similar approach can be used from the lateral side of the knee.
Arthrocentesis of the knee
The knee and connecting suprapatellar pouch can be punctured while the patient is supine and the knee is extended. The needle, 18- or 20-gauge, can be inserted anteromedially, under the cephalad half or third of the patella. Alternatively, the needle can be inserted laterally, just under the cephalad edge of the patella (shown in drawing). |

Positioning for Knee Arthrocentesis
Position the patient supine on the stretcher with the knee either extended fully or flexed 15 or 20° with a towel roll under the knee. Align the foot perpendicularly to the floor.
Step-by-Step Description of Knee Arthrocentesis
Palpate the knee to identify the patella. If desired, mark the needle insertion site with a skin-marking pen or preferably an indentation (before cleansing the skin).
Rest the knee on an underpad. Prepare the site and surrounding area with a skin-cleansing agent, such as chlorhexidine or povidone iodine, then use an alcohol wipe to remove the agent.
Place a wheal of local anesthetic over the needle entry site using a 25-gauge needle. Then inject more anesthetic into the deeper tissues along the anticipated trajectory of the arthrocentesis needle, but do not enter the joint space.
Aspirate the joint using an 18- or 20-gauge needle on a 20- to 60-mL syringe. If using a three-way stopcock, the stopcock is installed between the needle and the syringe.
Enter the skin in a perpendicular fashion and direct the needle posteriorly behind the patella, toward the intercondylar notch. To avoid touching articular cartilage with the needle, try to maintain a horizontal needle trajectory; also, you may grasp the patella and gently pull it upward.
Pull back on the plunger gently as the needle is advanced. Synovial fluid will enter the syringe when the capsule is entered. If the needle hits bone, retract almost to the skin surface and then redirect at a different angle. If aspiration is unsuccessful, you can try moving from a position of slight knee flexion to complete extension or try the procedure from the opposite side of the knee.
Aspirate as much fluid as possible. Apply gentle pressure to the suprapatellar region to help drain extra fluid.
In large effusions, a second syringe may be required. You may leave the needle in place by holding it securely with a hemostat or by using the three-way stopcock during syringe exchanges.
If intra-articular medications (eg, anesthetic, glucocorticoid) are to be given, hold the hub of the needle motionless (using a hemostat if available) while removing the synovial fluid-containing syringe and replace it with the medication-containing syringe. If the needle has remained in place in the joint space, there will be no resistance to medication injection.
After injecting a glucocorticoid, move the joint through full range of motion to distribute the medication throughout the joint.
Transfer synovial fluid to tubes and other transport media for synovial fluid analysis. Inspect the fluid for blood and fat.
After aspiration, remove the needle and cover the site with an adhesive bandage or sterile dressing.


Aftercare for Knee Arthrocentesis
Ice, limited weight bearing, and oral nonsteroidal anti-inflammatory drugs (NSAIDs) may help relieve pain.
With large effusions, apply an elastic bandage after the procedure to help limit swelling and pain.
If intra-articular anesthetic has been given, limited joint activity should be prescribed for 4 to 8 hours. Weight-bearing joints, such as the knee or ankle, may be especially prone to injury after anesthetization.
If an intra-articular glucocorticoid has been given, the joint should be rested for approximately 24 to 48 hours.
If the patient has increased erythema, pain, and/or swelling > 12 hours after the procedure, the joint should be examined for possible infection.
Warnings and Common Errors for Knee Arthrocentesis
Carefully ensure optimal positioning before joint puncture.
Allow adequate time for local anesthesia to take effect before proceeding.
To avoid damaging the synovium and articular cartilage, do not advance the needle against resistance and do not move the needle once it has begun draining synovial fluid.
If the needle tip must be relocated, first withdraw it almost to the skin surface and then redirect; do not try to change the angle of insertion while a needle is embedded in tissue.
Distinguish a knee effusion from effusion or swelling of the prepatellar bursa (anterior to the patella).
Tips and Tricks for Knee Arthrocentesis
Consider doing ultrasound if there is no obvious large effusion.
Additional fluid can sometimes be aspirated by applying pressure to the suprapatellar pouch and then to the popliteal space while aspirating.
Note also that warmth, tenderness, and erythema may overlie an acutely inflamed arthritic joint, mimicking extra-articular infection.
When trying to differentiate infectious arthritis from infection of the overlying structures (a contraindication to arthrocentesis), infectious arthritis is more likely with the following:
Joint effusion
Circumferential joint pain and capsule tenderness
Pain with both gentle, passive motion and with active joint motion
When inspecting fluid, consider the following:
A hemarthrosis caused by a traumatic tap tends to be nonuniformly bloody and may clot.
Fat within a hemarthrosis (lipohemarthrosis) is caused by an occult fracture.
References
1. Yui JC, Preskill C, Greenlund LS. Arthrocentesis and Joint Injection in Patients Receiving Direct Oral Anticoagulants. Mayo Clin Proc. 2017;92(8):1223-1226. doi:10.1016/j.mayocp.2017.04.007
2. Tarar MY, Malik RA, Charalambous CP. Bleeding complications in patients on warfarin undergoing joint injection/aspiration: systematic review and meta-analysis. Rheumatol Int. 2023;43(2):245-251. doi:10.1007/s00296-022-05232-y
Drug Information for the Topic