A number of procedures are used to gain vascular access.
Peripheral Vein Catheterization
Most patients’ needs for IV fluid and medications can be met with a percutaneous peripheral venous catheter. If blind percutaneous placement is difficult, ultrasound guidance usually results in successful placement.
Venous cutdown can be used on the rare occasions when percutaneous catheter insertion is not feasible. Typical cutdown sites are the cephalic vein in the arm and the saphenous vein at the ankle. However, venous cutdown is rarely needed because of the popularity of peripherally inserted central catheter (PICC) lines, midline catheters, and intraosseous lines in both adults and children.
For a step-by-step description of how to do peripheral vein catheterization, see How To Insert a Peripheral Intravenous Catheter and How To Do Ultrasound-Guided Peripheral Intravenous Catheter Insertion.


Common complications (eg, local infection, venous thrombosis, thrombophlebitis, interstitial fluid extravasation) can be reduced by using a meticulous sterile technique during insertion and by replacing or removing the catheters within 72 hours.
Central Venous Catheterization
Patients needing secure or long-term vascular access (eg, to receive antibiotics, chemotherapy, or parenteral nutrition) and those with poor peripheral venous access require a central venous catheter (CVC). CVCs allow infusion of solutions that are too concentrated or irritating for peripheral veins and allow monitoring of central venous pressure (CVP).
CVCs can be inserted through the jugular, subclavian, axillary, or femoral veins or via the upper arm peripheral veins (PICC line). Although the type of catheter and site chosen are often determined by individual clinical and patient characteristics, a jugular CVC or PICC line is usually preferred to a subclavian CVC (associated with a higher risk of bleeding and pneumothorax) or femoral CVC (associated with a higher risk of infection). During cardiac arrest, fluid and medications given through a femoral vein CVC often fail to circulate above the diaphragm because of the increased intrathoracic pressure generated by cardiopulmonary resuscitation (CPR). In this case, a subclavian or internal jugular approach may be preferred.
Ultrasound guidance for placement of internal jugular or axillary lines and PICC lines is standard care and reduces the risk of complications. Coagulopathy should be corrected whenever feasible prior to CVC insertion; the subclavian approach should not be used in patients with uncorrected coagulopathy because the venipuncture site cannot be monitored or compressed.

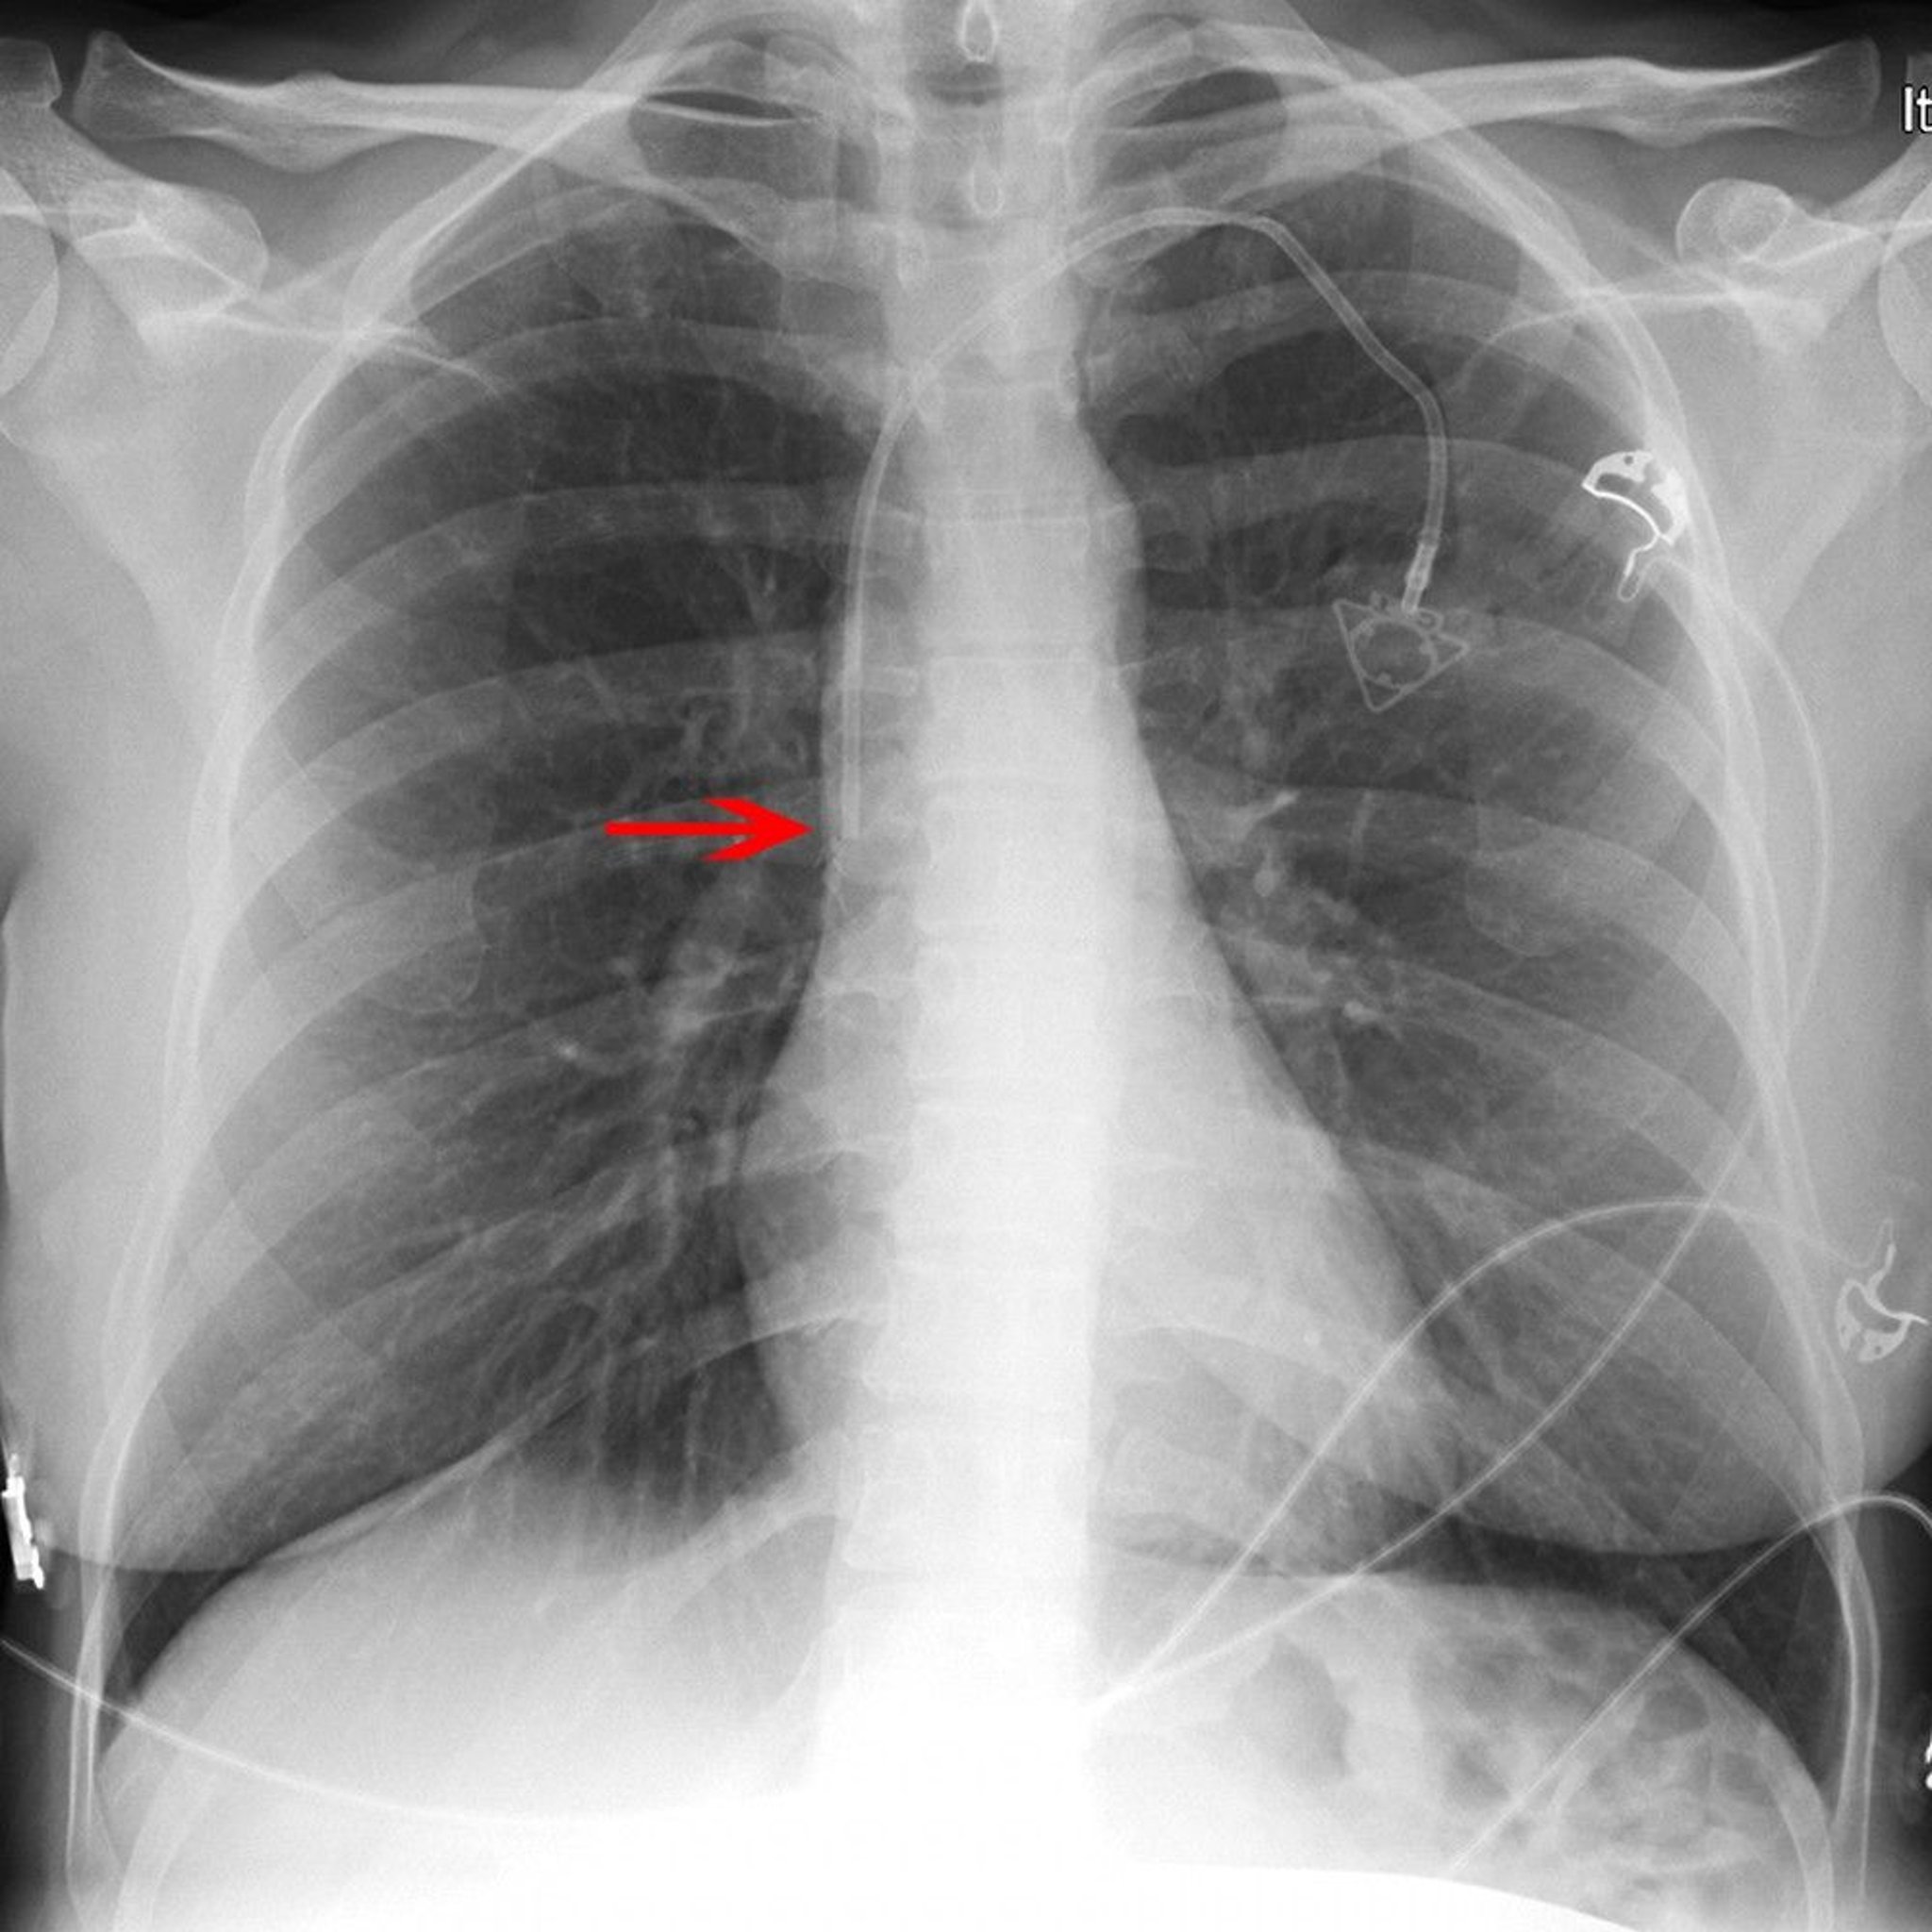
The red arrow points to the tip of a left subclavian venous port catheter (placed appropriately in the lower superior vena cava).
© 2017 Elliot K. Fishman, MD.
For a step-by-step description of how to do central venous catheterization, see the following:
How To Do Infraclavicular Subclavian Vein Cannulation, Ultrasound-Guided
How To Do Internal Jugular Vein Cannulation, Ultrasound-Guided

Chlorhexidine swab is used to prep the skin in the right groin area. We use a wide prep to prepare for a right central
Video created by Hospital Procedures Consultants at www.hospitalprocedures.org.
The patient is placed in Trendelenburg position and then a chlorhexidine swab is used to prep the left anterior chest w
Video created by Hospital Procedures Consultants at www.hospitalprocedures.org.

Chlorhexidine swab is used to do a sterile prep of the right anterior chest wall. We’re using the swab in a back and fo
Video created by Hospital Procedures Consultants at www.hospitalprocedures.org.

Video created by Hospital Procedures Consultants at www.hospitalprocedures.org.

Video created by Hospital Procedures Consultants at www.hospitalprocedures.org.

Video created by Hospital Procedures Consultants at www.hospitalprocedures.org.


Chlorhexidine swab is used to prep the skin in the right groin area. We use a wide prep to prepare for a right central venous catheter insertion. After the prep dries we will place a wide sterile barrier. The sterile drape should cover the entire lower half of the body including the bed between the patient and the operator. We're now using a sterile sheath to grasp the ultrasound probe that has had a non-sterile ultrasound gel applied to the top. You grasp the ultrasound probe and then carefully pull the sterile sheath over the probe so that you can have a sterile probe to do real time ultrasound.
Now we're going to prepare the catheter. We're applying needleless caps on to the blue port and the white port of the catheter and we're going to use sterile saline to flush each of the ports. Here we're flushing the white and the blue port of the catheter that have the caps in place. And with the brown port which is the distal port the wire will be coming out of that port so we do not have a cap in place but after we flush that port we'll have to clip the line before removing the sterile saline syringe.
Now with the 1 percent lidocaine we're applying a sterile label so that all the syringes can have sterile identification. Sterile ultrasound gel is then used on the skin and now we're looking at the right femoral artery and the femoral vein in transverse orientation. The femoral artery is on the top left-hand side. With compression you can see that the right femoral vein compresses but that the right femoral artery which is more superficial and to the left does not compress. We're using 1 percent lidocaine for local anesthesia of the skin and the underlying soft tissue.
Now we're introducing a introducer needle at about a 45 degree angle inserted the same depth away from the probe as the vein is deep to the probe. We are inserting so that we gradually can see the needle advance into the vein and now we have return of venous blood. We're going to grasp the hub of the needle and withdraw the syringe to confirm that it is nonpulsatile blood. Now we're going to insert the sterile wire through the sheath and through the needle. We are going to rotate the probe into the longitudinal orientation and we can see that the wire is threading into the vein as the wire is advanced through the needle.
In the femoral location the wire can be advanced even as deep as 30 centimeters. Now the sheath is removed and the wire is left in place. It is important to never let go of the wire as it can embolize and travel through the vein. The needle is now withdrawn and leaving the wire in place you can still see that the wire is in the vein on the ultrasound image. And now the probe can be dropped and sterile gauze can be used to identify the insertion site clearly, and then a scalpel could be used to nick the skin over the wire. Now a dilator is inserted over the wire and the wire is grasped on the opposite side of the dilator. The dilator is advanced with a twisting motion to dilate a tract through the subcutaneous tissue and into the femoral vein.
Now the dilator is withdrawn leaving the wire in place. The wire is then threaded back through the central venous catheter until you can grasp the wire on the opposite end of the brown or distal port of the catheter. Now the wire is grasped on the distal end of the catheter and then the catheter is advanced all the way to the end of the catheter. And now the wire is withdrawn back into its sterile sheath and completely withdrawn out of the body. Once the wire is completely withdrawn the brown port is clipped.
Now we're introducing the last needleless cap onto the brown port and then it will be unclipped and then you will withdraw the blood into the syringe and then the whole line is flushed, care being taken not to inject any air into the port. Now the white and the blue ports of the central venous catheter are flushed with sterile saline. Now some local anesthesia is used to numb up the skin adjacent to the central venous catheter, a bio-patch is applied at the insertion site with the blue side angled towards the ceiling. This is a patch that's impregnated with chlorhexidine to minimize the risk of catheter related bloodstream infections.
And now suture is used to secure the catheter in place in two locations. After this is secured, a sterile occlusive dressing will be applied over the central line to complete the procedure. Here an instrument tie is being used to secure the central line using suture which is done in two locations.
Video created by Hospital Procedures Consultants at www.hospitalprocedures.org.

The patient is placed in Trendelenburg position and then a chlorhexidine swab is used to prep the left anterior chest wall all the way up, half way up the neck and then also broadly to cover the left shoulder. The chlorhexidine has to be allowed at least two minutes to fully dry for good antisepsis. Now a sterile wide drape is being applied with the hole centered on the insertion site. This sterile drape should cover the head and almost all of the bed.
Now we're drawing up 1 percent lidocaine which we'll use for local anesthesia. Since all of the fluid in a sterile field must be labeled after the syringe is full of the lidocaine, a sterile label with 1 percent lidocaine will be added onto the syringe. The normal saline syringes are already pre-labeled and therefore do not need an extra sterile label to be applied to them. Now we're applying a sterile sheath onto the linear array probe so we can do real time ultrasound guidance for this ultrasound guided Subclavian line. The sterile sheath should cover the entire sterile drape.
Now we will apply some sterile rubber bands to keep the sterile sheath in place. Here we're using sterile saline to flush out all the ports of the catheter. As we are doing this we're also exchanging the classic needle caps for needle-less caps and these are applied to the blue and the white port of this triple lumen catheter. The brown port of the triple lumen catheter is the distal port and will be left without a cap because the wire will eventually be threaded back through this brown port. After you flush the brown port the port has to be clipped before the syringe is removed.
Now we're using local anesthesia to numb up the skin and underlying subcutaneous tissue at the insertion site. We're using a linear array probe with an enplane technique so that we can visual the needle from the skin all the way down to the axillary vein which is visualized in a longitudinal plane. At this moment you can see that the needle is almost popping into the vein. At this moment it just popped through right now so you can have aspiration of purple blood as is seen right here. The needle hub is then grasped and the syringe is removed and then the J-tipped wire is threaded through the needle hub with the curve directed towards the heart. You can see that the needle – the wire is visualized going through the vein as we gradually introduce the wire through the needle. And the wire is threaded to a 20 centimeter depth at the skin.
Now the sheath is removed and then the needle is then removed over the wire. A scalpel nick is then created over the wire at the insertion site and we guarantee that the wire can move freely within that stab wound. Now a dilator is being introduced over the wire and then the dilator will be gradually advanced with a twisting motion to dilate up a subcutaneous tract all the way into the subclavian vein. The dilator is now removed, care being taken not to pull out the wire inadvertently. And now the catheter is being introduced over the wire and gradually pulled back until the wire can be grasped beyond the distal brown port.
Once the wire can be grasped beyond the brown port then you can introduce the catheter to the appropriate depth of insertion which in a left Subclavian vein is normally 16 to 17 centimeters. However, with ultrasound guidance you would add an additional 3 centimeters on top of that. And so we introduce this catheter all the way to 19 centimeters at the skin. We're now flushing out all three ports, the blue port, the white port and finally the brown port with sterile saline.
Now an antimicrobial impregnated patch or bio-patch is applied to the insertion site to minimize the risk of catheter related bloodstream infection. We're applying more 1 percent lidocaine for local anesthesia and then we're using suture to secure the catheter in place in two locations. An instrument tie can be used to suture the catheter in place. Now we're applying a sterile occlusive dressing with the bio-patch and the entire insertion site visualized in the open window, and then wings will be applied at the bottom to minimize the opening through which the three ports come through. And the procedure is complete.
Video created by Hospital Procedures Consultants at www.hospitalprocedures.org.

Chlorhexidine swab is used to do a sterile prep of the right anterior chest wall. We’re using the swab in a back and forth motion to prep a large area of the anterior chest wall and the right shoulder.
Now we’re applying a sterile drape over the area. This sterile drape covers the entire bed.
Now we are using sterile saline flush, to flush all three ports of a triple lumen catheter. We can switch the normal caps on the triple lumen catheter to needleless caps. We’re applying the needleless caps on the white port and the blue port of the triple lumen catheter. We’re not going to apply the needleless cap on the brown port which is the distal port of the triple lumen catheter, as that is the port that the wire will eventually come out of.
When we flush the brown port, as is shown here, we have to clip the line before we take off the syringe.
We’re now going to get all of our equipment that we need including an introducer needle, the sterile wire, the scalpel and the dilator in a position where we can easily grasp them. The J-Curve of the wire will be directed towards the heart, which in a subclavian line is directed towards the feet, as is shown here for the right side and the left side.
Now we’re going to draw up some 1% lidocaine which will be used for local anesthesia of the skin and the periosteum of the clavicle.
All of these syringes that contain sterile fluid have to be labeled on your sterile field. The sterile saline flushes are pre-labeled as sodium chloride, but the 1% lidocaine syringe is not labeled and therefore, these sterile labels can be used to label the 1% lidocaine syringe, as is shown here.
Now we’re using our two hands to identify the curve of the clavicle which is the primary landmark that you have to identify when you’re performing an infraclavicular subclavian line placement. Once you identify the curve of the clavicle, you will make the insertion site one centimeter towards the deltopectoral groove from the curve of the clavicle. At that insertion site, we’ll use 1% lidocaine for local anesthesia, as is shown here. We also insert deeply until we can anesthetize the periosteum of the clavicle along the track.
Now we’re inserting the introducer needle underneath the clavicle with the needle as parallel to the floor as possible. We put our index finger in the sternal notch and used the thumb of the non-syringe hand to help guide that needle underneath the clavicle inserting towards the top of the index finger and the sternal notch until we see this flash of venous blood. We then advance that introducer needle about two millimeters. Then take off the syringe when we see non-[inaudible] blood, we can now advance the wire through the needle until you reach the 20 centimeters mark of the wire.
Now the needle is removed over the wire with a careful control of the wire. We’re using a scalpel to nick the skin. Now we are advancing a dilator over the wire to dilate a tract through the skin, subcutaneous tissue and into the subclavian vein. We’re advancing the dilator with a twisting motion until it is at the hub of the dilator for an infraclavicular subclavian line placement.
Now we’re removing the dilator and keeping control of the wire. We are introducing the catheter over the wire now. The wire will come out the brown port of the catheter. The wire is grasped at the distal end, beyond the brown port and then the catheter is advanced to the appropriate depth of insertion, which in a right subclavian line is approximately 15 centimeters at the skin. For a left subclavian line, you would advance the catheter until about 17 centimeters at the skin.
Now we are withdrawing the wire from the catheter, directly into the wire sheath. As you do this, you have control of the catheter to make sure that the catheter is not pulled out as you’re pulling the wire out.
Now we’re going to insert the last needleless cap onto the brown port. We withdraw blood into that brown port until you can see it in the syringe that contains sterile saline. Then the port is flushed with a saline.
Now the blue port and the white port will be flushed and you just have to withdraw the saline until you see a little bit of blood in the line in both the blue port and the white port. Then flush the saline to clear out that blood.
Now we’re applying a white and blue central line clip, approximately two centimeters from the insertion site so that we can secure the central line to the skin in four places. We’re using 1% lidocaine to numb up the skin in these four places.
Now we’re applying a bio patch, which is a chlorhexidine impregnated patch, with the blue side of the patch up towards the ceiling over the insertion site. This decreases the risk of central line associated blood stream infections.
We’re using a needle driver with a curved needle to suture the central line in place in these four locations. Here an instrument tie is being used to secure the suture.
Once all four of those sites have been sutured into place, we can apply a sterile occlusive dressing with the window that has the insertion site, including the bio-patch, in view. Then the notch of the sterile occlusive dressing, will have the three ports of the central line, come through that notch.
Then the second part of the sterile occlusive dressing has these wings that will go underneath the three ports of the central line to fully secure the central line in place. A sterile pen can then be used to place your initials, the date and time of the central line.
Video created by Hospital Procedures Consultants at www.hospitalprocedures.org.

Video created by Hospital Procedures Consultants at www.hospitalprocedures.org.

Video created by Hospital Procedures Consultants at www.hospitalprocedures.org.

Video created by Hospital Procedures Consultants at www.hospitalprocedures.org.
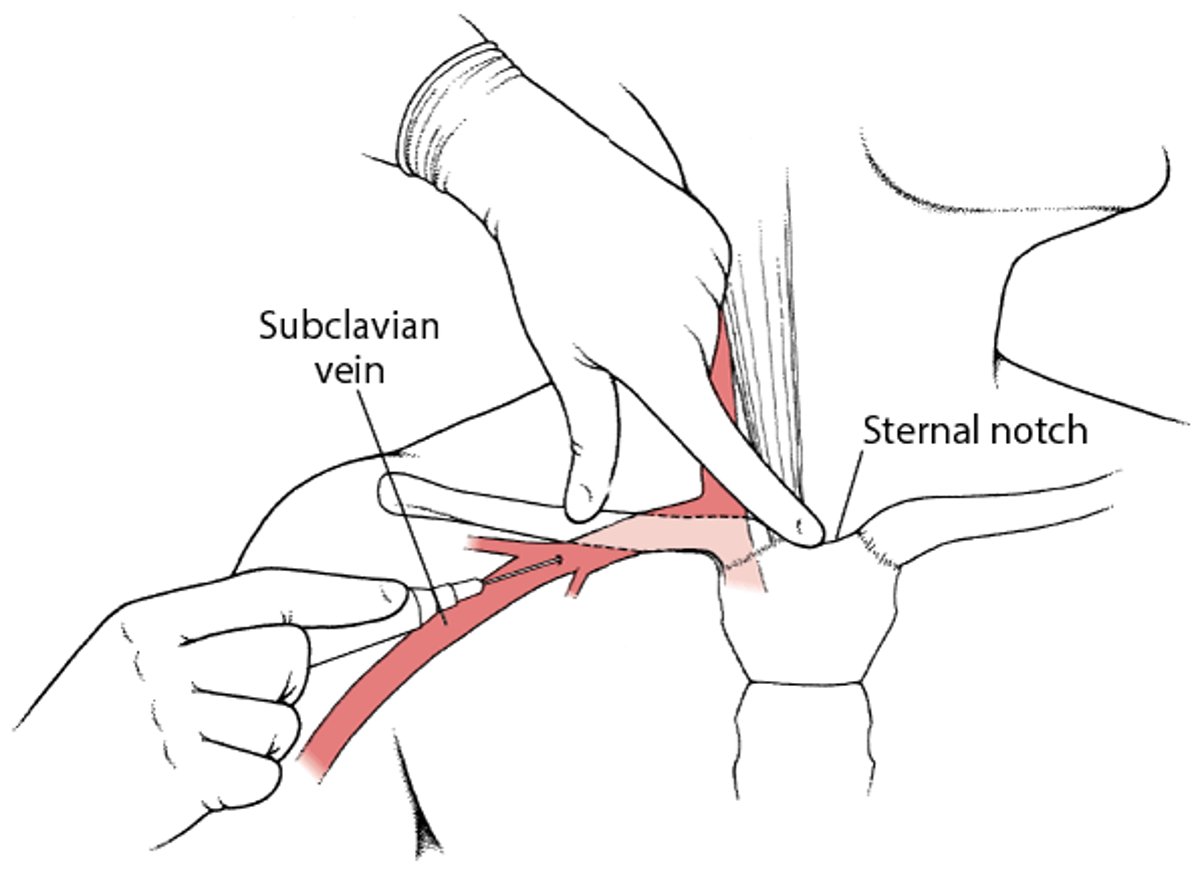
Subclavian Venipuncture
This figure shows hand position during subclavian venipuncture (infraclavicular approach). |

Complications of central venous catheterization
CVCs can cause many complications (see table ). Complications such as pneumothorax occur in approximately 1% of patients after CVC insertion (1). Bacterial colonization of the catheter without systemic infection can occur, but catheter–line-associated bloodstream infections (CLABSI) occur around 4 per 1000 catheter-days (1).
Catheter-related venous thrombosis, particularly in the upper extremities, also may occur.
Atrial or ventricular arrhythmias occur during catheter insertion but are generally self-limited and subside when the guidewire or catheter is withdrawn from within the heart.
Rarely, accidental arterial catheterization requires surgical repair of the artery.
Hydrothorax and hydromediastinum may occur when catheters are positioned extravascularly.
Catheter damage to the tricuspid valve, bacterial endocarditis, and air and catheter embolism occur rarely.
To reduce the risk of venous thrombosis and catheter sepsis, clinicians should remove CVCs as soon as possible. The skin entry site must be cleansed and inspected daily for local infection; the catheter must be replaced if local or systemic infection occurs. Routine replacement of CVCs to prevent CLABSI is not recommended (2).
Complications Associated With Central Venous Catheters
Complication | Possible Sequelae |
|---|---|
Common | |
Carotid artery injury | Bleeding, respiratory compromise,neurologic complications (eg, stroke) |
Puncture of pleura or lung | |
Puncture of vein resulting in a leak | Bleeding, extravasation of fluid, hemodynamic compromise |
Subclavian, carotid, or femoral artery injury | Bleeding, vascular compromise of an extremity, hemothorax, hemodynamic compromise |
Thrombosis | Limb edema |
Less common | |
Air embolism | |
Arrhythmias | Cardiac arrest |
Brachial plexus injury | Compromise of an extremity |
Erosion of catheter | Bleeding, extravasation of fluid, hemodynamic compromise |
Infection | |
Injury to clavicle, rib, or vertebra | |
Lymphatic injury | Chylothorax |
Valvular injury | |
Central venous catheterization references
1. Teja B, Bosch NA, Diep C, et al. Complication Rates of Central Venous Catheters: A Systematic Review and Meta-Analysis [published correction appears in JAMA Intern Med. 2024 Jun 1;184(6):707. doi: 10.1001/jamainternmed.2024.2175]. JAMA Intern Med. 2024;184(5):474-482. doi:10.1001/jamainternmed.2023.8232
2. Centers for Disease Control and Prevention: Intravascular Catheter-related Infection (BSI) Prevention Guidelines. April 12, 2024. Accessed July 10, 2025.
Midline Peripheral Catheterization
Midline catheters (MC) are 8 to 20 cm in length, have a single or double lumen, and are placed into the basilic, cephalic, or brachial vein peripherally in the patient's nondominant arm 1.5 cm above or below the antecubital fossa. Although placement of a MC requires use of the modified Seldinger technique and ultrasound guidance, MCs are not considered central venous catheters because the tip is located at or below the axillary vein. Thus, radiographic confirmation of correct placement of the MC tip is not necessary. MCs may be used instead of CVCs when central venous hemodynamic monitoring is not required. MCs should not be used for infusion of irritant or vasoactive agents; CVCs should be used instead.
Criteria for using MCs (1):
Patients anticipated to require intermediate to long-term intravenous therapy (likely to exceed 6 days)
Patients who have poor venous access requiring multiple needlestick attempts or blood draws
Patients likely to require frequent blood draws to monitor their condition
MCs have been found to have lower phlebitis rates than peripheral catheters and lower infection rates than central venous catheters (2).
Midline peripheral catheterization references
1. Centers for Disease Control and Prevention: Infection Control: Summary of Recommendations: Guidelines for the Prevention of Intravascular Catheter-Related Infections (2011). February 28, 2024. Accessed July 10, 2025.
2. Alexandrou E, Ramjan L, Spencer T, et al: The use of midline catheters in the adult acute care setting – clinical implications and recommendations for practice. JAVA 16:35–41, 2011. doi: 10.2309/java.16-1-5
Arterial Catheterization
The use of automated noninvasive blood pressure devices has diminished the use of arterial catheters simply for pressure monitoring. However, these catheters are beneficial in patients whose condition is unstable and who require minute-to-minute pressure measurement and in those requiring frequent arterial blood gas sampling. Indications include refractory shock and respiratory failure. Blood pressure is frequently somewhat higher when measured by an arterial catheter than by sphygmomanometry. Initial upstroke, maximum systolic pressure, and pulse pressure increase the more distal the point of measurement, whereas the diastolic and mean arterial pressures decline. Vessel calcification, atherosclerosis, proximal occlusion, and extremity position can all affect the value of arterial catheter measurements.
For a step-by-step description of how to do arterial catheterization, see How To Do Radial Artery Cannulation and How To Do Radial Artery Cannulation, Ultrasound-Guided.

Video created by Hospital Procedures Consultants at www.hospitalprocedures.org.

Here we're prepping with a chlorhexidine swab and we're doing a full sterile drape. Notice that we have a wide sterile
Video created by Hospital Procedures Consultants at www.hospitalprocedures.org.

Video created by Hospital Procedures Consultants at www.hospitalprocedures.org.

Video created by Hospital Procedures Consultants at www.hospitalprocedures.org.

Here we're prepping with a chlorhexidine swab and we're doing a full sterile drape. Notice that we have a wide sterile drape on this procedure just as we do with the central line. Here's a sterile sheath that goes over the ultrasound probe. The probe has been preset with non-sterile gel that is over the probe prior to the sterile sheath going over it. We are drawing up one percent sterile lidocaine. Here we're applying the sterile rubber bands over the probe sheath to secure it and applying a sterile ultrasound gel. This is 1 percent lidocaine for local anesthesia.
We're identifying the radial artery, first in the transverse plane, and when it's in the center of the ultrasound screen we're slowly rotating the probe to the longitudinal plane so that we are now seeing the radial artery in the longitudinal plane. With the radial artery visualized in the longitudinal plane we are now inserting the radial artery needle that is now being visualized in an in-plane technique that is going into the radial artery until we see a flash. We're now inserting the wire over or through the needle and now advancing the catheter over the wire in a rotating motion. We're going to use some gauze underneath the catheter and then using a sterile 4 x 4 gauze to grasp the tubing that is to the arterial line. This is so that you don't mess up your sterile gloves. We're screwing the arterial tubing to the catheter.
Now we're going to take a straight needle connected to 2-0 silk suture to secure the catheter to the skin. We're inserting the needle through a section of the skin that is adjacent to a groove in the catheter. We will then run the blunt end of the needle lateral to medial underneath the groove of the catheter several times and then we will tie the suture securing the catheter to the skin. Here, we are securing the suture onto the catheter. At this point we're applying a bio-patch with the blue side of the patch oriented towards the ceiling. This is a patch that's impregnated with chlorhexidine to minimize the risk of a catheter related bloodstream infection. Now a sterile occlusive dressing is being applied over the bio-patch and the catheter. And the procedure is complete.
Video created by Hospital Procedures Consultants at www.hospitalprocedures.org.

Video created by Hospital Procedures Consultants at www.hospitalprocedures.org.
Complications of arterial catheterization
At all sites, complications include bleeding, infection, thrombosis, intimal dissection, and distal embolism. Catheters should be removed if signs of local or systemic infection are present.
Radial arterial complications include ischemia of the hand and forearm due to thrombosis or embolism, intimal dissection, or spasm at the site of catheterization. The risk of arterial thrombosis is higher in small arteries (explaining the greater incidence in women) and with increased duration of catheterization. Occluded arteries nearly always recanalize after catheter removal.
Femoral arterial complications include atheroembolism during guidewire insertion. The incidence of thrombosis and distal ischemia is much lower than that for radial arterial catheterization.
Axillary arterial complications include hematomas, which are infrequent but may require urgent care because brachial plexus compression can result in permanent peripheral neuropathy. Flushing the axillary arterial catheter may introduce air or a clot. To avoid neurologic sequelae of these emboli, clinicians should select the left axillary artery for catheterization (the left axillary artery branches further distal to the carotid vessels than does the right).
Intraosseous Infusion
Any fluid or substance routinely given IV (including blood products) may be given via an intraosseous needle inserted in the medullary cavity of select long bones. Fluids reach the central circulation as quickly as with venous infusion. This technique is used commonly in infants and young children because their bony cortices are thin and easily penetrated and peripheral and central venous access can be quite difficult, particularly in shock or cardiac arrest. However, in older patients, intraosseous infusion can be used at various sites (eg, sternum, proximal tibia, proximal humerus) via special devices (eg, pressure-loaded puncture device, drilling device).
For a step-by-step description of how to do intraosseous cannulation, see How To Do Intraosseous Cannulation, Manually and With a Power Drill.

Procedure demonstrated by Eric Sanders, MD, EM-2. Walter A. Schrading, MD, FACEP, faculty supervisor. WellSpan York Hospital Emergency Medicine Residency Program York, PA. Cadaver specimens provided by Maryland State Anatomy Board, DHMH. Filmed on location at School of Medicine, Anatomical Services Division, Univ. of Maryland.

© Elsevier Inc. All Rights Reserved.
This video is for personal informational use. Users are prohibited from copying, reproducing, licensing, subscribing, selling, leasing or distributing this video.
Intraosseous (IO) Needle Insertion
The physician’s fingers and thumb are wrapped around the proximal tibia to stabilize it; the hand should not be placed directly behind the insertion site (to avoid self-puncture). Instead, a towel may be placed behind the knee to support it. The physician holds the needle firmly in the palm of the other hand, directing the point slightly away from the joint space and growth plate. The needle is inserted approximately 1 to 2 cm below the tibial tuberosity with moderate pressure and a rotary motion; it is stopped as soon as a pop indicates penetration of the cortex. Some needles have a plastic sleeve, which can be adjusted to prevent them from being pushed too deeply into or through the bone. |

Drug Information for the Topic