The Hennepin technique uses external rotation, plus traction and abduction (Milch method variant) if necessary. This technique requires only one operator and can be performed gently, sometimes without analgesia.
(See also Overview of Shoulder Dislocation Reduction Techniques, Overview of Dislocations, and Shoulder Dislocations.)
Indications for the Hennepin Technique
Anterior dislocation of the shoulder
Reduction should be attempted soon (eg, within 30 minutes) after the diagnosis is made.
Reduction should be attempted immediately if an associated neurovascular deficit or skin tenting (due to a displaced bone fracture or, less commonly, fracture dislocation, with potential for skin penetration or breakdown) is present. If an orthopedic surgeon is unavailable, closed reduction can be attempted, ideally using minimal force; if reduction is unsuccessful, it may need to be performed in the operating room under general anesthesia.
Open dislocations require surgery, but closed reduction techniques and immobilization should be performed as interim treatment if the orthopedic surgeon is unavailable and a neurovascular deficit is present.
Contraindications to the Hennepin Technique
Contraindications to simple closed reduction:
Greater tuberosity fracture with > 1 cm displacement
Significant Hill-Sachs deformity (≥ 20% humeral head deformity due to impaction against glenoid rim)
Surgical neck fracture (below the greater and lesser tuberosities)
Bankart fracture (anteroinferior glenoid rim) involving a bone fragment of over 20% and with glenohumeral instability
Proximal humeral fracture of 2 or more parts
These significant associated fractures require orthopedic evaluation and management, because of the risk of the procedure itself increasing displacement and injury severity.
Other reasons to consult with an orthopedic surgeon prior to reduction include
The joint is exposed (ie, an open fracture or dislocation where bone or fracture segments penetrate the skin).
The patient is a child, in whom a physeal (growth plate) fracture is often present; however, if a neurovascular deficit is present, reduction should be performed immediately if the orthopedic surgeon is not available.
The dislocation is older than 7 to 10 days, due to an increased risk of damaging the axillary artery during the reduction, especially in older patients.
Contraindications to the Hennepin technique:
If the patient's arm is fixed in abduction, the FARES technique, Stimson technique, or scapular manipulation is preferred.
Complications of the Hennepin Technique
Complications are uncommon with the Hennepin technique.
Equipment for the Hennepin Technique
Intra-articular anesthetic*: 20 mL of 1% lidocaine, 20-mL syringe, 5 cm (2-inch) 20-gauge needle, antiseptic solution (eg, chlorhexidine, povidone iodine), gauze pads
Shoulder immobilizer or sling and swathe
* Patients are offered analgesia; however, if the patient wishes, one reduction attempt without analgesia may be performed.
Additional Considerations for the Hennepin Technique
Reduction attempts are more likely to succeed if patients are calm and can relax their muscles and not resist the procedure. Analgesia and sedation help patients relax, as may external distractions such as pleasant conversation.
Procedural sedation and analgesia (PSA) is often needed if substantial pain, anxiety, and muscle spasm impede the procedure.
Regional anesthesia can be used (eg, ultrasound-guided interscalene nerve block) but has the disadvantage of limiting post-reduction neurologic examination.
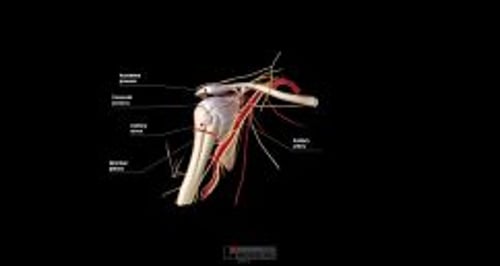
Relevant Anatomy for the Hennepin Technique
In most anterior dislocations, the humeral head is trapped outside and against the anterior lip of the glenoid fossa. Reduction techniques must distract the humeral head away from the lip and then return the humeral head into the fossa.
Deficits of the axillary nerve are the most frequent nerve deficits with anterior shoulder dislocations. They often resolve within months, and sometimes very soon after the shoulder reduction.
Axillary artery injury is rare with anterior shoulder dislocations and suggests possible concurrent brachial plexus injury (because the brachial plexus surrounds the artery) (1).
Positioning for the Hennepin Technique
Position the patient supine (typically) or seated.
Position the affected arm with the humerus in adduction, the elbow flexed 90° (to relax the long head of the biceps and ease movement of the humeral head), and the wrist in neutral position.
Step-by-Step Description of the Hennepin Technique
Neurovascular examination
Perform a pre-procedure neurovascular examination of the affected arm, and repeat the examination after each reduction attempt. Generally, testing motor function is more reliable than testing sensation, partly because cutaneous nerve territories may overlap. Assess the following:
Distal pulses, capillary refill, cool extremity (axillary artery)
Light touch sensation of the lateral aspect of the upper arm (axillary nerve), thenar and hypothenar eminences (median and ulnar nerves), and dorsum of the 1st web space (radial nerve)
Shoulder abduction against resistance, while feeling the deltoid muscle for contraction (axillary nerve): However, if this test worsens the patient's pain, omit it until after the shoulder has been reduced
Thumb-index finger apposition ("OK" gesture) and finger flexion against resistance (median nerve)
Finger abduction against resistance (ulnar nerve)
Wrist and finger extension against resistance (radial nerve)
Intra-articular analgesia
If a cooperative patient chooses to try reduction without analgesia, only one such attempt should be made. To administer intra-articular analgesia:
The needle insertion site is approximately 2 cm inferior to the lateral edge of the acromion process (into the depression created by the absence of the humeral head).
Swab the area with antiseptic solution, and allow the antiseptic solution to dry for at least 1 minute.
Optional: Place a skin wheal of local anesthetic (≤ 1 mL) at the site.
Insert the intra-articular needle perpendicular to the skin, apply back pressure on the syringe plunger, and advance the needle medially and slightly inferiorly approximately 2 cm.
If any blood is aspirated from the joint, hold the needle hub motionless, switch to an empty syringe, aspirate all of the blood, and re-attach the anesthetic syringe.
Inject 10 to 20 mL of anesthetic solution (eg, 1% lidocaine).
Wait for analgesia to occur (up to 15 to 20 minutes) before proceeding.
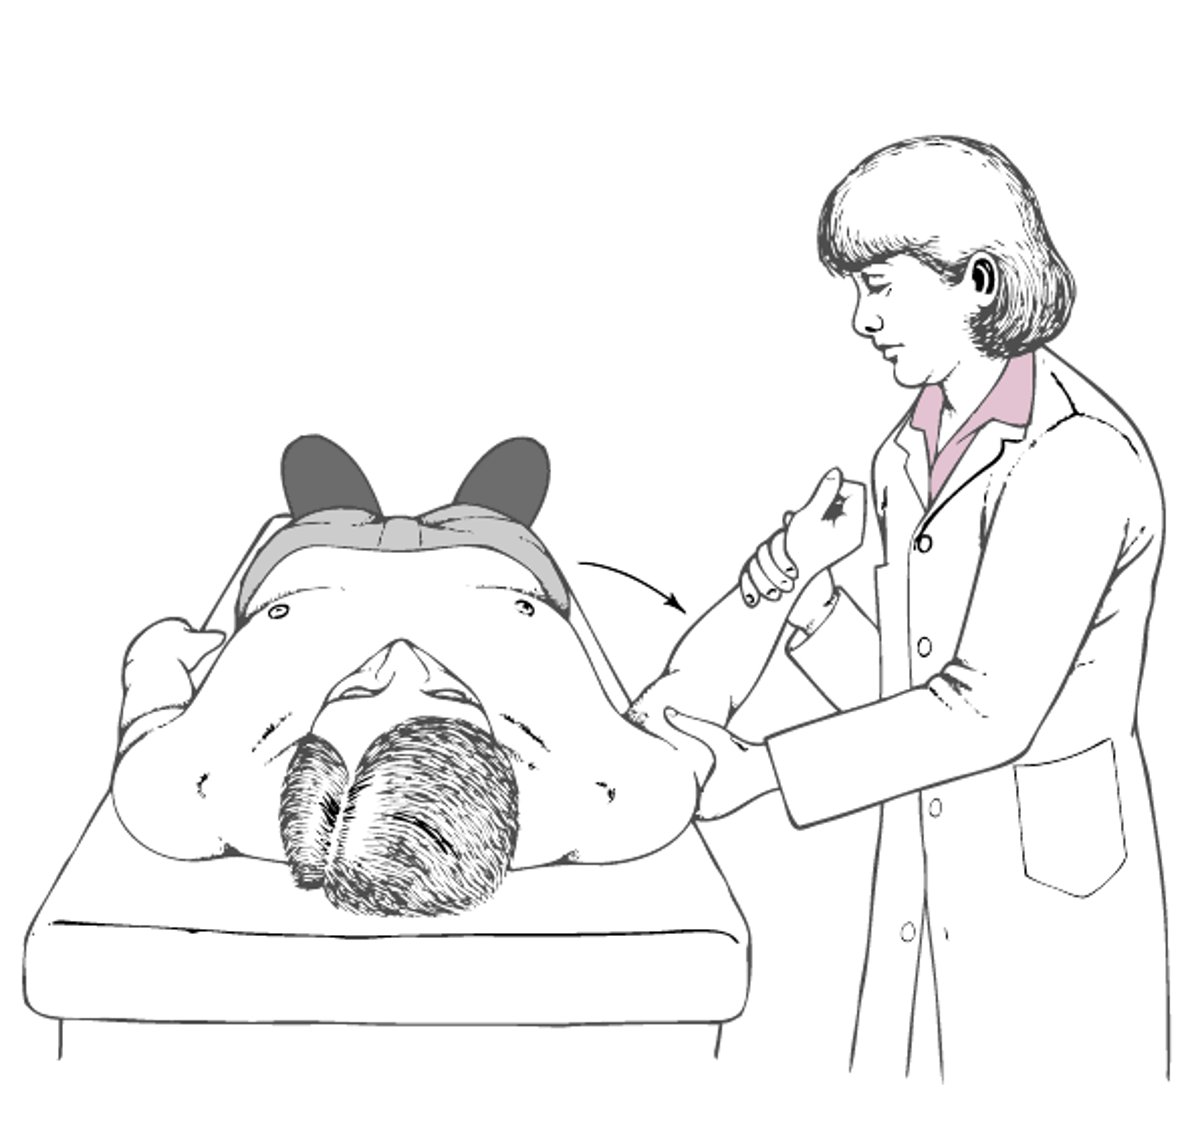
Hennepin Technique for Reducing Anterior Shoulder Dislocations
The clinician adducts the dislocated arm with the elbow held at 90°. The arm is then externally rotated slowly (eg, over 5 to 10 min) to allow time for muscle spasms to resolve. Reduction commonly occurs at 70 to 110° of external rotation. |

Reduce the shoulder — Hennepin method
Using one hand, hold the affected upper arm adducted against the patient's side.
Using your other hand, gently hold the patient’s wrist, keeping the elbow flexed 90° and the forearm neutral (ie, thumb pointing cephalad).
Instruct the patient to try to relax the arm as you guide it through the maneuver.
Slowly and gently, rotate the arm externally, by applying minimal force to the volar surface of the wrist. Work as if you were guiding the arm through passive external rotation. Continue until the forearm is near the coronal plane (ie, 90° of external rotation).
If the patient experiences pain or muscle spasm, pause momentarily and keep the arm motionless, so the patient can focus on relaxing and allowing muscle spasms to resolve.
Reduction commonly occurs at 70 to 110° of external rotation and may take up to 5 or 10 minutes. Reduction is frequently subtle and may be difficult to identify (the perceptible "clunk" that occurs with more forceful reduction methods may be absent).
If reduction is not achieved at this point, maintain the arm’s position and apply slow, gentle traction at the elbow (do not apply traction if a neurovascular injury is suspected).
If reduction is still not achieved, maintain the arm’s external rotation and gentle traction, and slowly abduct the arm to the overhead position while pushing the humeral head upward into the glenoid using your thumb in the axilla. (This is a variant of the Milch method (2), the steps of which are gentle full abduction, slight axial traction and external rotation, plus, if needed, upward pressure via thumb or fingers directly to the humeral head.)
Restore the arm to the pre-reduction position (adducted, non-rotated). If reduction has failed to occur thus far, sometimes it will occur as the arm is rotated back internally.

Aftercare for the Hennepin Technique
Successful reduction is preliminarily confirmed by restoration of a normal round shoulder contour, by decreased pain, and by the patient's renewed ability to reach across the chest and place the palm of the hand upon the opposite shoulder.
Immobilize the shoulder with a sling and swathe or with a shoulder immobilizer.
Because the joint can spontaneously dislocate after successful reduction, do not delay immobilizing the joint.
Perform a post-procedure neurovascular examination. A neurovascular deficit warrants immediate orthopedic evaluation.
Perform post-procedure radiographs to confirm proper reduction and identify any coexisting fractures.
Arrange orthopedic follow-up.
Warnings and Common Errors for the Hennepin Technique
Allow sufficient time for muscle spasms to resolve before proceeding through the procedure; too-rapid reduction is a common cause of failure with this technique.
Apparent shoulder dislocation in a child is often a fracture involving the growth plate, which tends to fracture before the joint is disrupted.
Tips and Tricks for the Hennepin Technique
In patients who return with increased pain within 48 hours after a reduction, hemarthrosis is possible (unless the shoulder has again dislocated). If there has been no other trauma, the shoulder is not dislocated and pain is increasing, aspirate the blood from the joint space (see How To Do Arthrocentesis of the Shoulder). If available, use ultrasound guidance.
References
1. Perlmutter GS, Apruzzese W. Axillary nerve injuries in contact sports: recommendations for treatment and rehabilitation. Sports Med. 1998;26(5):351-361. doi:10.2165/00007256-199826050-00005
2. Johnson G, Hulse W, McGowan A. The Milch technique for reduction of anterior shoulder dislocations in an accident and emergency department. Arch Emerg Med. 9(1):40-43, 1992.
Drug Information for the Topic